Aren’t your iPhone and all its photos like a magic box? However, looking for that one excellent picture can be like finding a needle in a haystack, so what are you going to do? Well, no worries! This guide is all about helping you to tidy up your photo collection. Think of it like making your images a cozy nest where all pictures will just seem easier to find. Whether you are a semi-casual photo taker or an acclaimed selfie pro, let us look at some practical ways to help organize your photos on your iPhone. The time is here to make your pictures feel at home. Let’s get started!
1. Create Albums
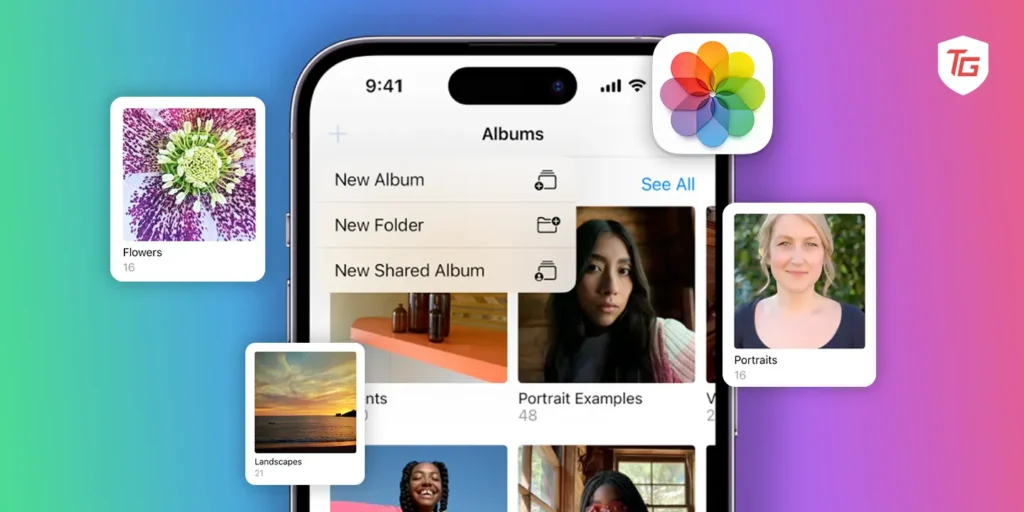
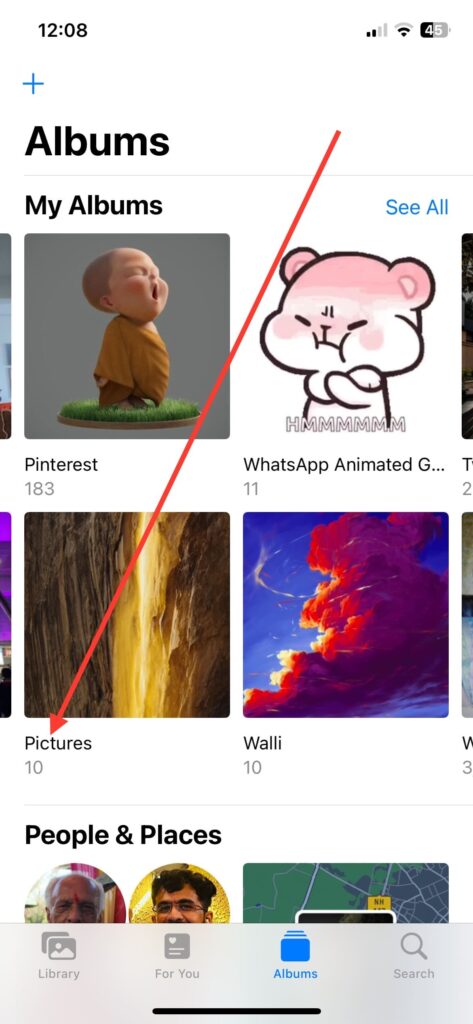
Creating albums in the Photos app on your iPhone is a simple method that allows you to categorize and group your pictures based on themes, events, or people. Albums provide a structured way to access and share specific sets of photos, making it easier to navigate through your extensive photo library. Whether organized by vacations, family gatherings, or personal milestones, albums streamline the browsing experience and help you cherish and revisit your most cherished memories with efficiency.
To create a new album,
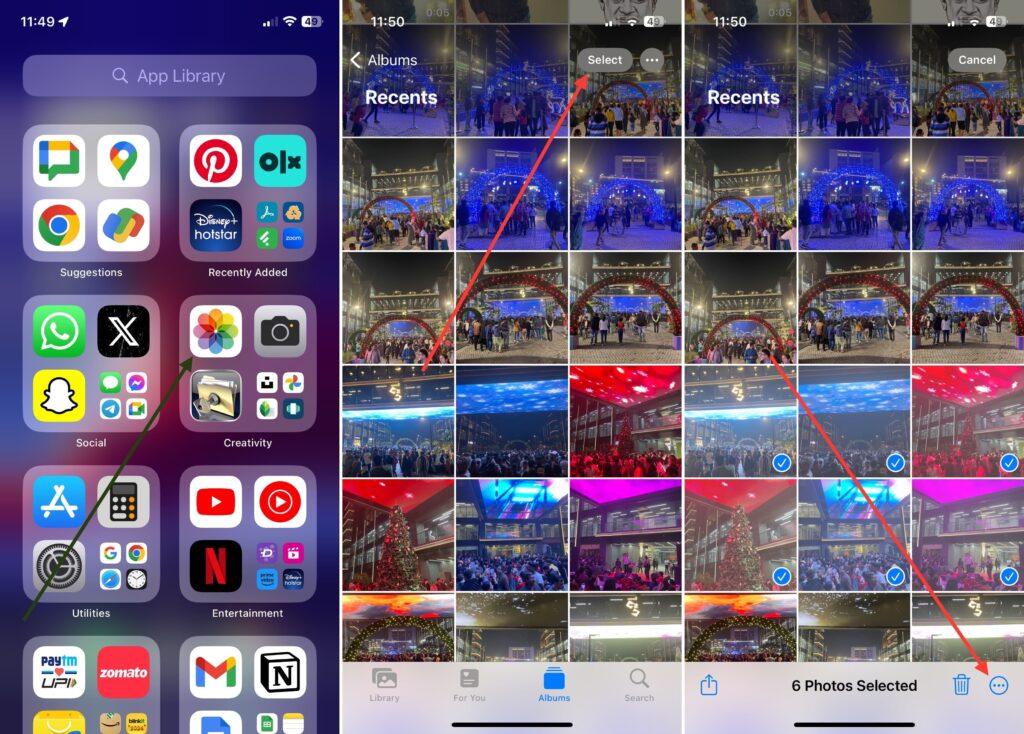
1. Launch the Photos app on your iOS device.
3. Then, tap the Select button in the top right corner.
4. Next, choose the pictures to be included in the album.
5. After that, tap the three dots menu button in the bottom right corner.
6. Lastly, select Add to Album.
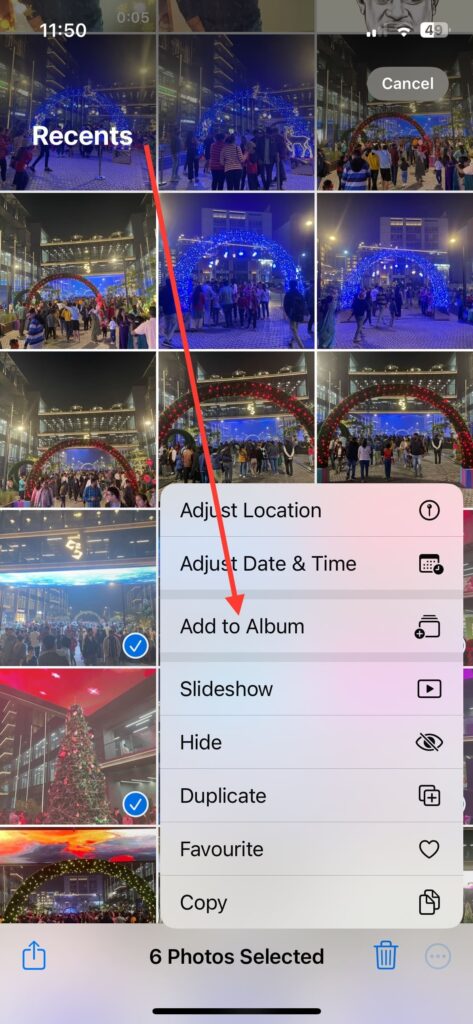
7. Finally, create a New Album or add it to one of your existing albums.

If you’re creating a new album, give a name to it and save it. Your pictures will be added to that album and you can then easily locate them in the Album section of your Photos app.
2. Organize Albums
Organizing albums in the Photos app allows you to keep your iPhone’s photo library organized and easy to navigate. By arranging photos into specific albums, you can quickly locate and relive moments associated with particular events, people, or themes. This organization not only enhances the overall user experience but also facilitates efficient sharing, as you can easily showcase curated sets of photos to friends and family. A variety of methods exist for managing albums, including sorting, deleting, and adding pictures.
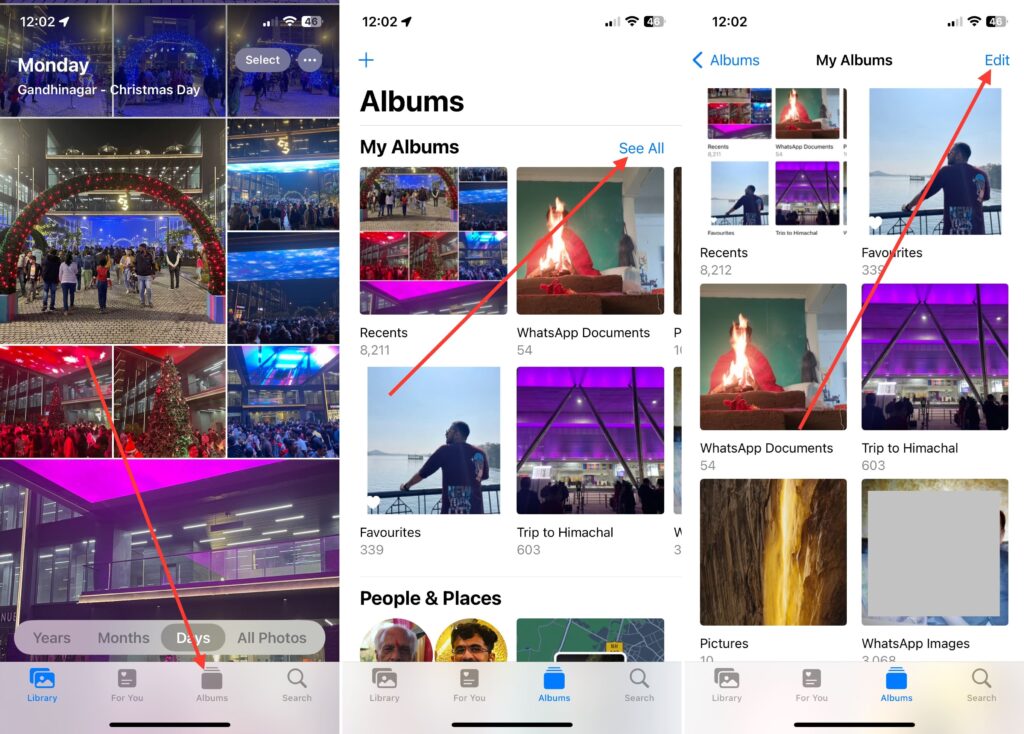
To edit album order:
1. Launch the Photos app on your iOS device.
2. Now, go to the Albums section bottom of the screen.
3. Here, select the See All option located at the top of all albums.
4. Then, select the ‘Edit’ button in the top right corner.
5. Finally, press and hold an album and drag it to the desired position.
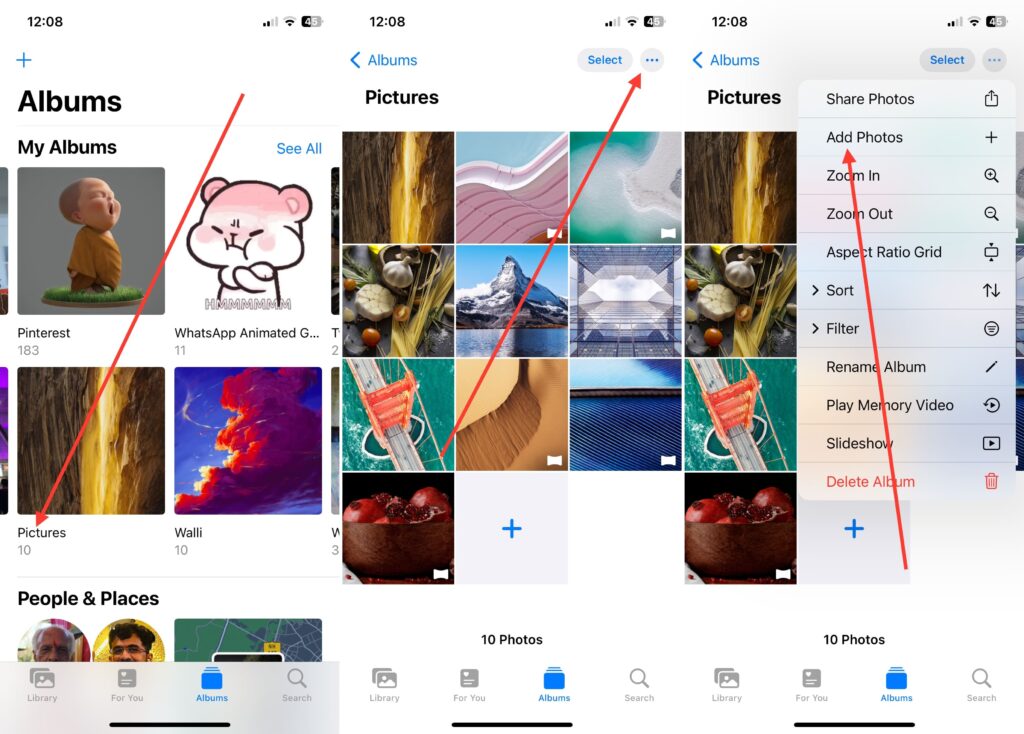
To add photos to an existing album:
1. Open the album in which you want to add pictures.
2. Now, select the three horizontal dots menu in the top right corner.
3. Then, choose Add Photos and then select the photos you want to add.
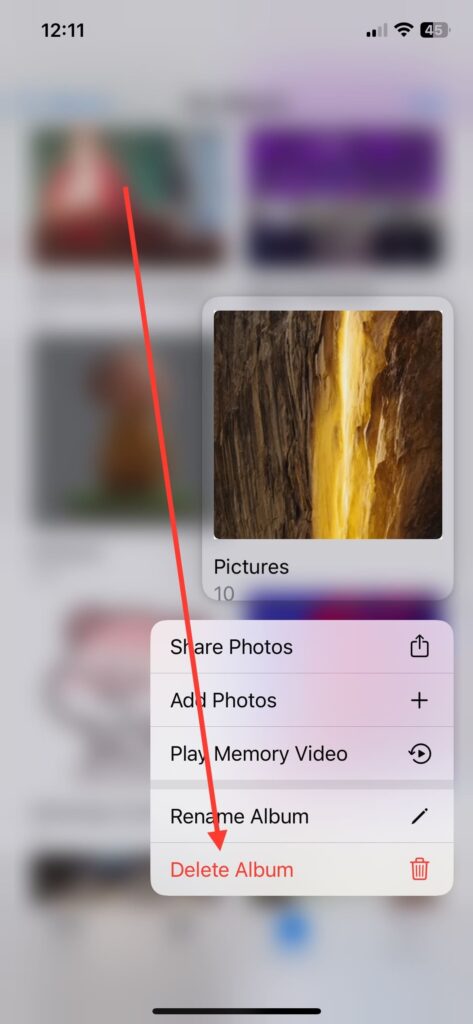
To delete albums:
1. Visit the Albums section in the Photos app.
2. Tap See All at the top of all albums.
3. Finally, press and hold the album, then tap Delete Album.
3. Favorite and Hide Photos
In order to allow the user to frequently access some photos, there is an option that allows the user to mark specific photos as ‘favorites’. Users can, however, choose which images they do not wish to be visible from their general view using the hidden option feature. If we categorize our best pictures, then they will become visible in a separate folder. There is also an option to hide photos in a separate hidden folder if someone does not want others to see them
To add pictures as your favorite:
1. Open the Photos app and visit the Albums section at the bottom of the app.
2. Now, select any album and open a picture.
3. Lastly, hit the heart button in the bottom corner.
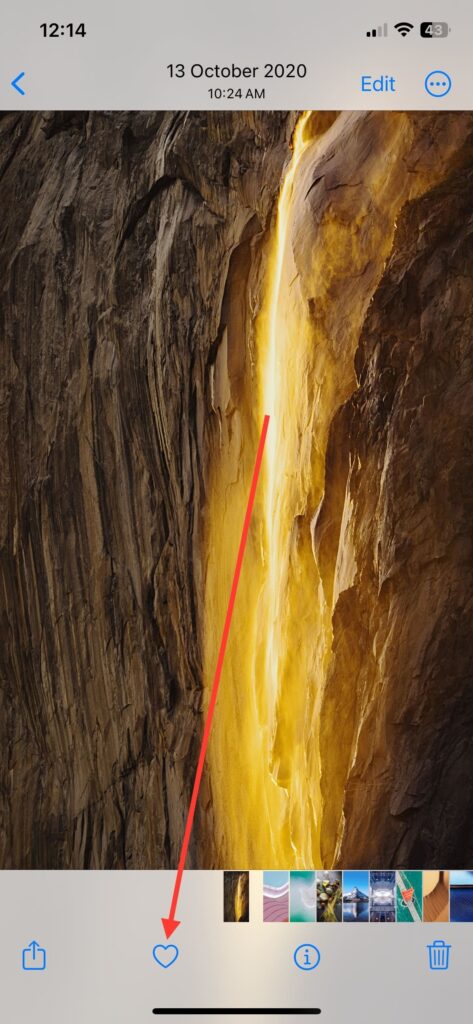
4. View all favorites in the “Favorites” album.
To hide photos:
1. Select photos you want to hide.
2. Tap the more button in the upper right corner and choose “Hide.”
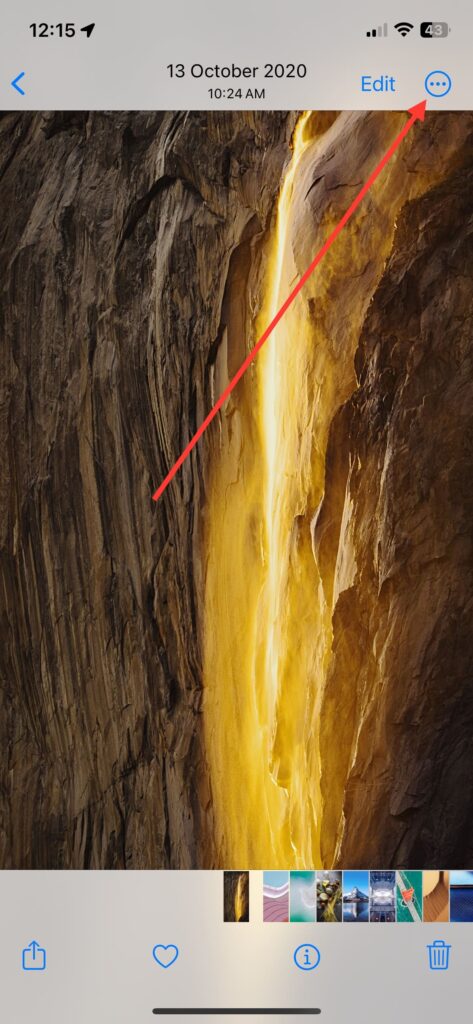
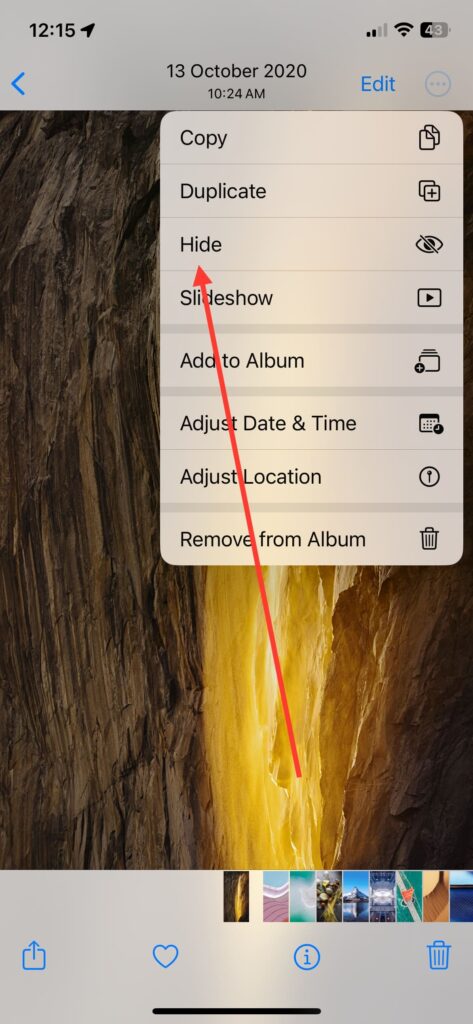
3. To view hidden photos, go to the “Albums” tab and find the “Hidden” album.
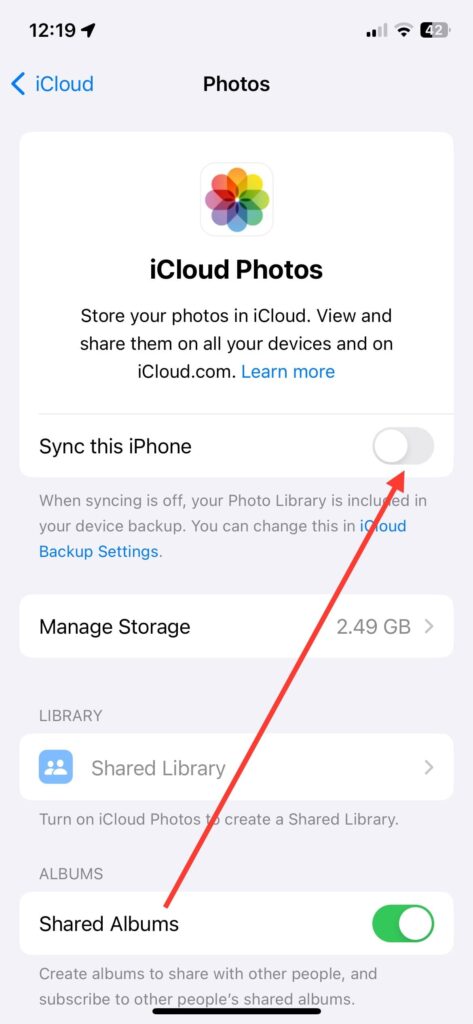
4. Use iCloud Photos
Using iCloud Photos gives you an easy and handy way to control your photo collection on all Apple gadgets. When you turn on iCloud Photos, all of your photos are kept safe on the cloud. It makes it easy to view them anywhere – on an iPhone, iPad or Mac – including on other devices that can access web pages. This not only makes the device storage free but also assures that your special memories are always updated and ready to use.
To use sync your photos to iCloud:
1. Launch the Settings app on your iOS device.
2. Now, tap the Apple ID settings, at the top of all settings.
3. Here, choose the iCloud option, then, choose the Photos menu.
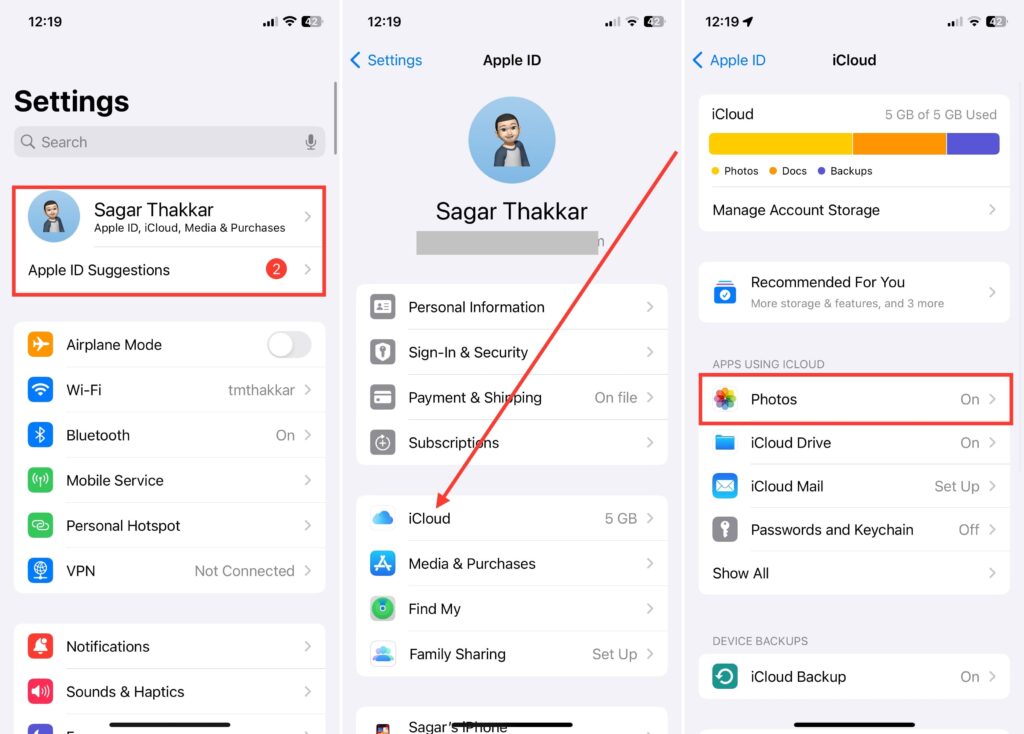
5. Lastly, enable the toggle for Sync this iPhone.
All the pictures you’ve in the Photos app will start syncing across iCloud and then you can access them on any Apple device.
5. Delete and Recover Photos
The choice to remove and recover pictures in the Photos app lets people carefully control their photo collection. Deleting pictures you don’t need helps make more room on your iPhone. This makes sure the phone works the best it can. With the “Recently Deleted” folder, you can keep track of your recent deletions more safely. It also lets you recover pictures you deleted by mistake in a certain time period.
To delete your pictures in the Photos app,
1. Launch the app and navigate to the picture that you want to delete.
2. Now, tap the Bin icon in the bottom right corner.
3. Here, choose Delete from the popup that will appear.
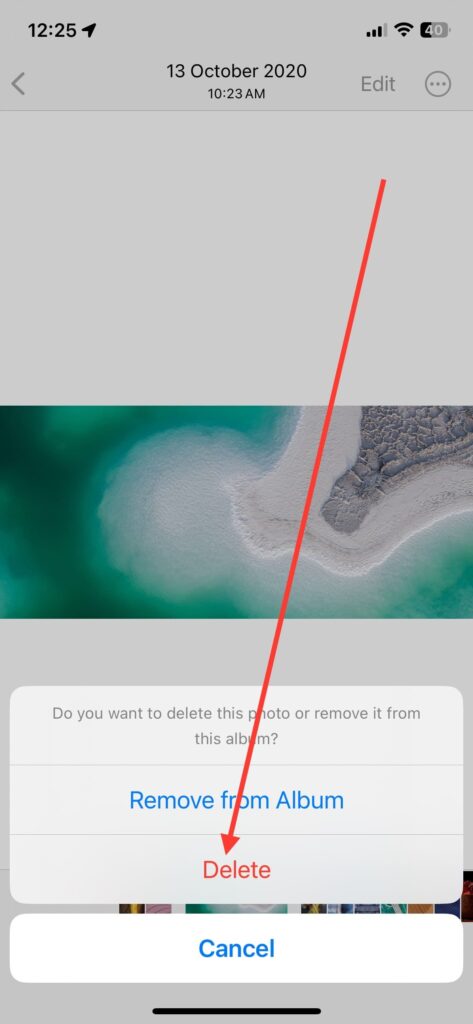
If you delete a picture this way, it doesn’t disappear permanently from your device. It remains in the recently deleted folder for a month unless it is emptied. If you accidentally deleted any picture from your device, here’s how you can delete it.
1. Launch the Photos app and head over to the Albums section.
2. Scroll down to the end of the screen and tap the Recently Deleted folder.
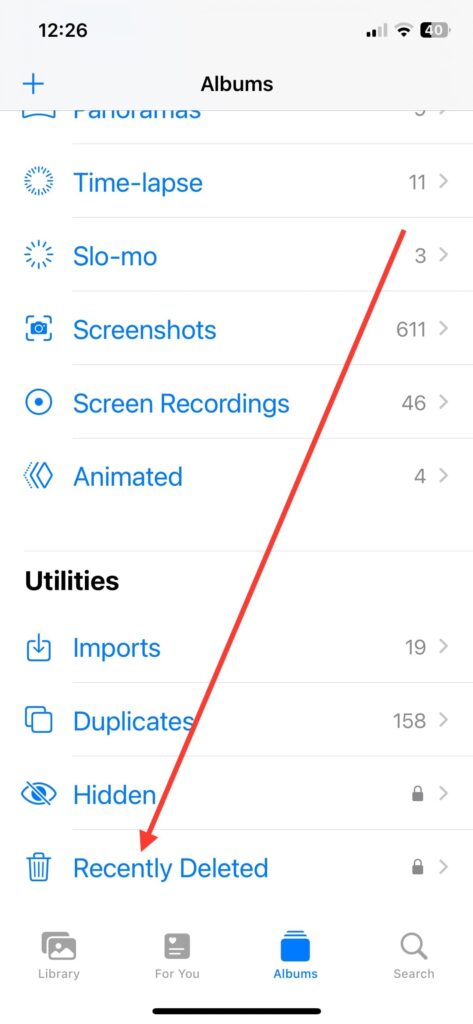
3. This folder will be secured by Face ID and passcode, so be sure to provide them.
4. Lastly, tap any image and then select Recover to restore it to the main album.
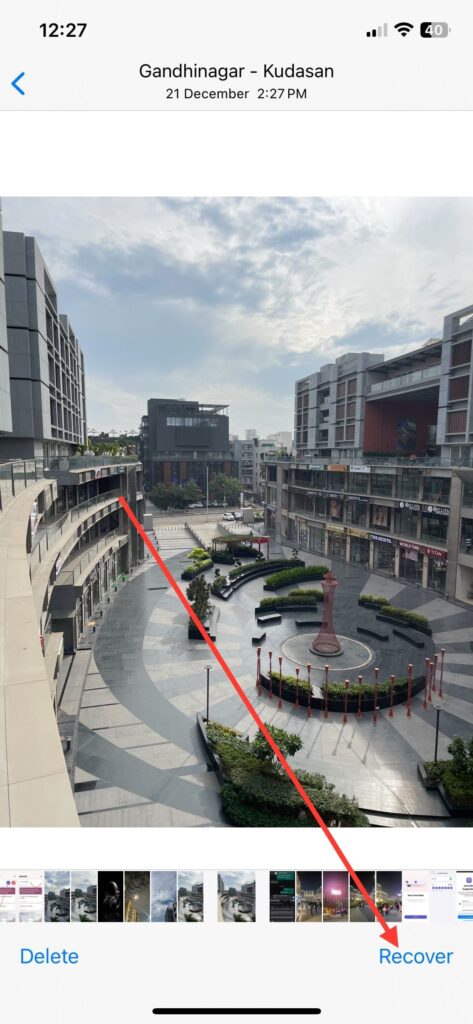
Or, tap the Select button in the top right corner, select the pictures you want to restore > tap the more icon in the bottom right corner, and then hit Recover.
6. Use Keywords and Captions in Photos
Using keywords and captions in the Photos app helps to give more meaning to your online memories. If you add clear words and titles to your pictures, it helps make all of them easy to find in a search. This not only helps find certain pictures but also adds to a better way of telling stories. It lets you share details, feelings, and importance hidden in every photo.
Here’s how to add descriptions to your pictures in the Photos app.
1. Launch the Photos app and select any picture you would like to add a caption to.
3. Here, tap the ‘i’ icon at the bottom of the screen.
4. Then, tap on the ‘Add Caption’ space to add a description for the picture.
5. Write a caption and hit the Done button.
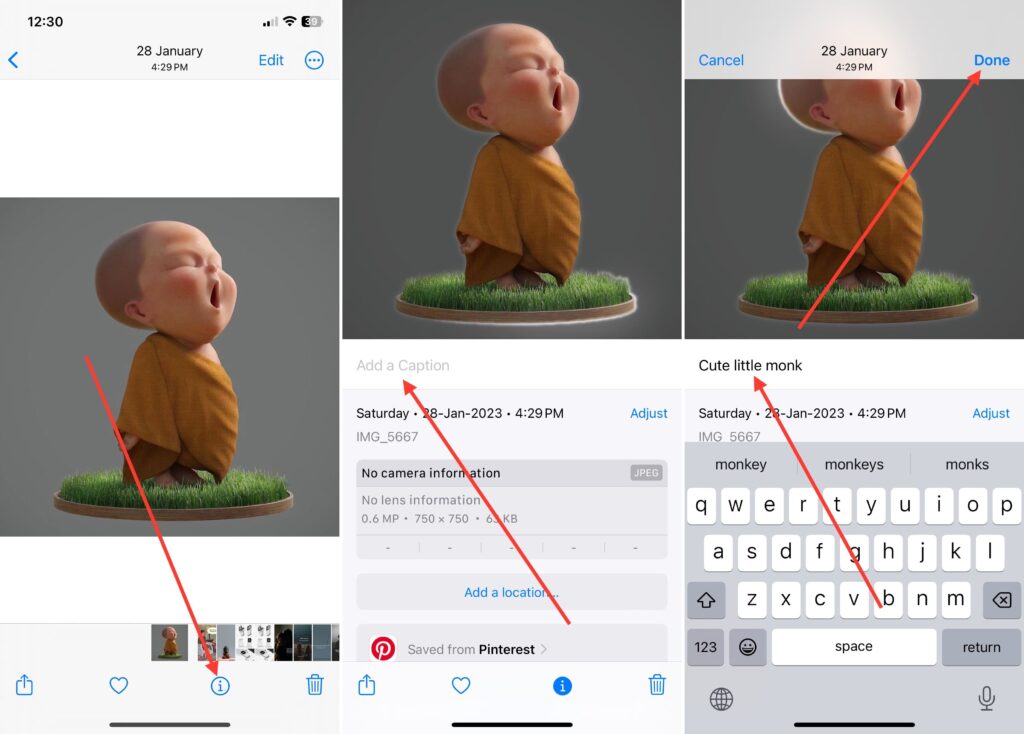
Now that the caption has been added, you will be able to search for pictures using that word or caption.
7. Search Photos
The search feature in the Photos app is a strong tool for quickly searching and finding certain pictures in your extensive photo library. This tool lets users find things by using words, places, times or names. It stops the need to look through things one at a time and saves a lot of important time and work. If you want to find memories from a certain event or pictures of specific people, the search function makes it easy. With just a few taps, you can quickly access your loved moments.
To search for particular pictures,
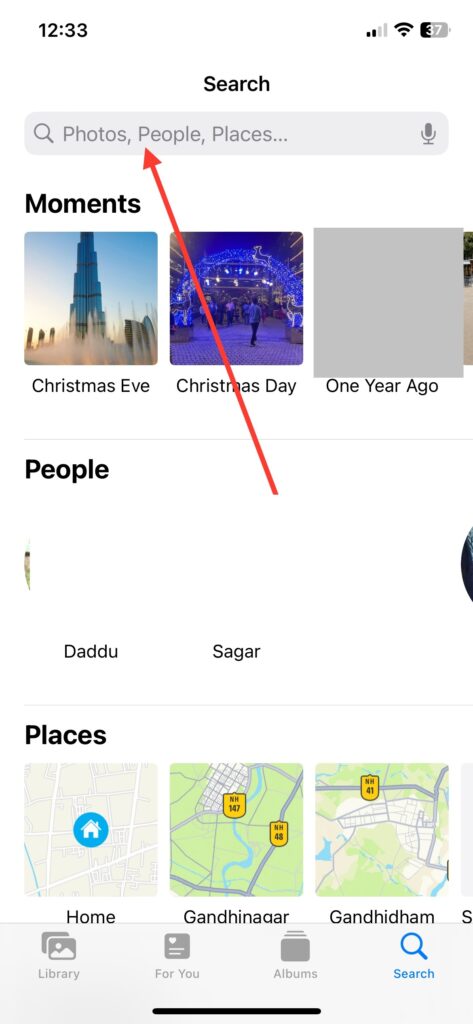
1. Launch the Photos app and tap the Search icon in the bottom right corner.
2. Here, pictures will already be sorted into collections of moments, people, places, categories, groups and more.
3. Use the search bar at the top of everything to find your pictures. Make use of these sorted collections if needed.
8. Declutter Photos and Manage iPhone Storage
Managing and improving storage on your iPhone well is important for keeping the device working right and having enough room to hold new memories. By regularly sorting and getting rid of unwanted pictures, you not only clear up storage but also make your photo collection easy to find. Using features like iCloud Photos and settings that manage space helps balance keeping all your photos saved while making sure the device runs smoothly.
To optimize iPhone storage on your iOS device:
- Launch the Settings app then navigate to the General settings.
3. Here, head over to the iPhone Storage.
4. Now, tap the Photos option.

5. Review each option carefully here.
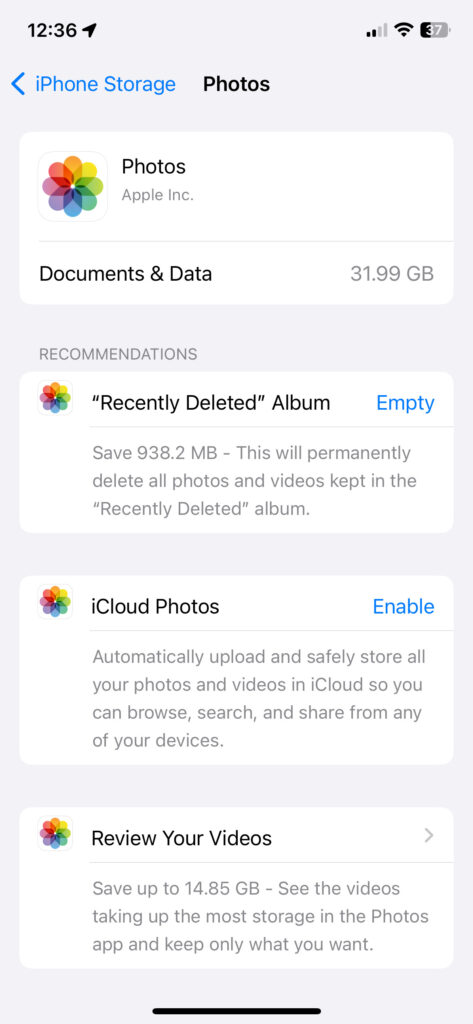
If you want to permanently delete pictures from your device, tap the Empty option next to ‘Recently Deleted” Album. Next, go to Review Your Videos and delete any unwanted and large videos from your iPhone.
9. Regularly Back Up Photos
Always make copies of your photos to keep them safe from sudden loss of information. Good memories are protected this way, too. Make sure you have your pictures saved by using iCloud or iTunes. This way, if something bad happens like losing your device, getting it damaged, or buying a new one – all your photos will still be there.
This active method not only keeps your digital memories safe but also gives you peace. It lets you take more pictures without fear of losing the old ones for sure. Making backup copies regularly is like having trusty insurance, and keeping your photo collection safe for the future.
To make sure your photos are syncing with iCloud, go to the iPhone Settings app > Apple ID settings > iCloud > toggle on the switch for Photos.
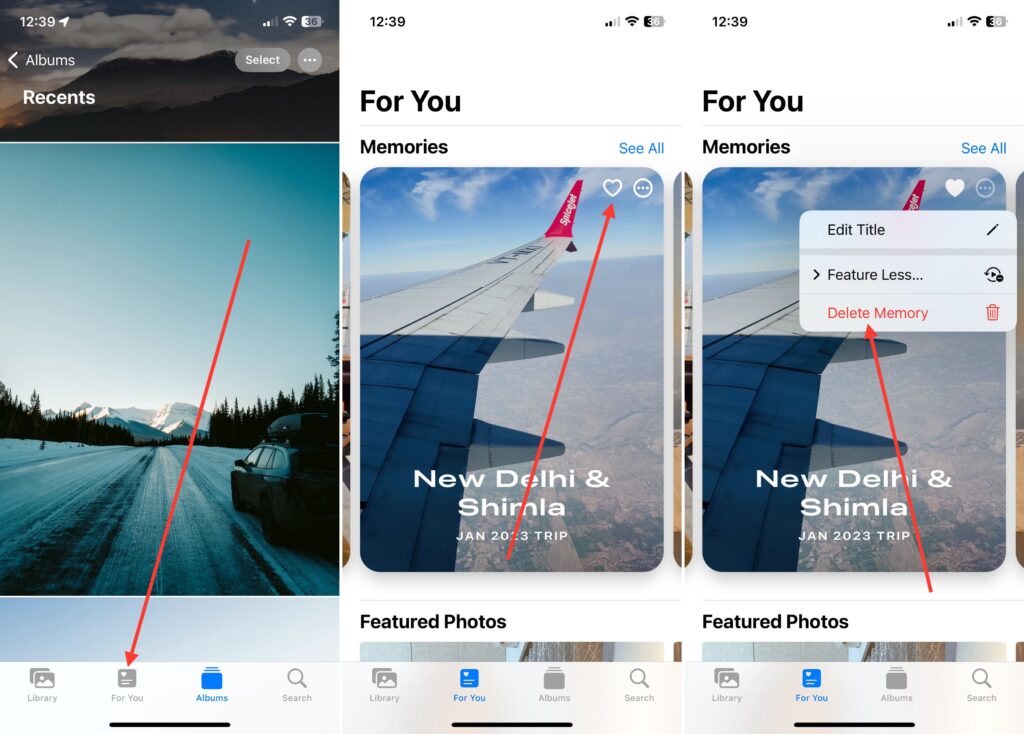
10. Utilise “Memories” Feature
The “Memories” part in the Photos app turns your photo albums into nice, old-fashioned memory collections. Memories groups pictures and videos from places, people, and times. This lets you watch special moments again through personal stories made of images. This feature gives you a fun trip to remember old times, but it also automatically organizes and shares collections of related photos. This makes your picture-viewing more emotional and interesting. Here’s how to view and manage memories on your iOS device:
1. Launch the Photos app on your iPhone and tap the For You section from the bottom of the screen.
2. Here, check out the memories created by the Photos app for you.
3. If you like an image, tap the heart to add it to your favorites.
4. If you don’t like the memories, tap the ‘More’ button and then select Delete Memory of Feature Less to discard it from the Photos app.
Conclusion:
And there you go – a trip from messy pictures to neatly arranged photos on your iPhone. You don’t need to scroll for long distances or search a lot for that special moment; now your photo collection is tidy and in order. By following these easy methods, your iPhone will turn into a special photo collection just for you. Now that your photo library is sorted, you can remember those moments, tell your tales, and let the pictures speak for themselves.
More iPhone Tips: