Windows is a very capable operating system, and it has become more robust and efficient over the years with each new OS version. However, while no credit can be taken away from the product, a few habits reduce the performance and speed of your individual computers. This is one reason you may notice that after a while using your computer, it becomes slower and less responsive. Simple operations like booting take more time. With some routine housekeeping, you can fix this issue, and in this guide, we will introduce you to the best ways to speed up Windows 10 and 11.
General Tips to Speed Up Windows 10 and 11
1. Constant Restarts
This is a simple process but very effective in maintaining optimal computer performance. When you reboot your computer, it clears out temporary files and refreshes your system’s memory. In addition, a restart will force problematic programs to shut down, which is very important if the system’s performance is hampered by minor glitches or conflicting third-party applications.
2. Keep Windows and Device Drivers Updated
Updates are essential to optimizing speed and performance on Windows 10 and 11. Windows and driver updates often include fixes for bugs that reduce the speed and performance of the computer. Updates may also include security patches.
To perform an update on Windows, you may use the Device Manager for specific driver updates or the Windows Update Settings, as shown below, for general OS and driver updates.
1. Open the Settings app by pressing Windows + I.
2. On the left pane, click Windows Updates, and on the right, click the Check for Updates button.

3. If there are any available updates, download and install them. You may be required to restart your computer.
3. Free Up Disk Space
The system drive can get clogged up. When this happens, the computer will become slower and show signs of reduced performance. Your workaround is freeing up disk space. To free up disk space, you may do any of the following:
- Delete unnecessary files
- Uninstall unused programs
- Move files to an external hard drive
As shown below, you may also use the built-in Disk Cleanup tool to free up space.
1. Click the Magnifying lens on the Taskbar, type Clean up, and click the Disk CleanUp tool.
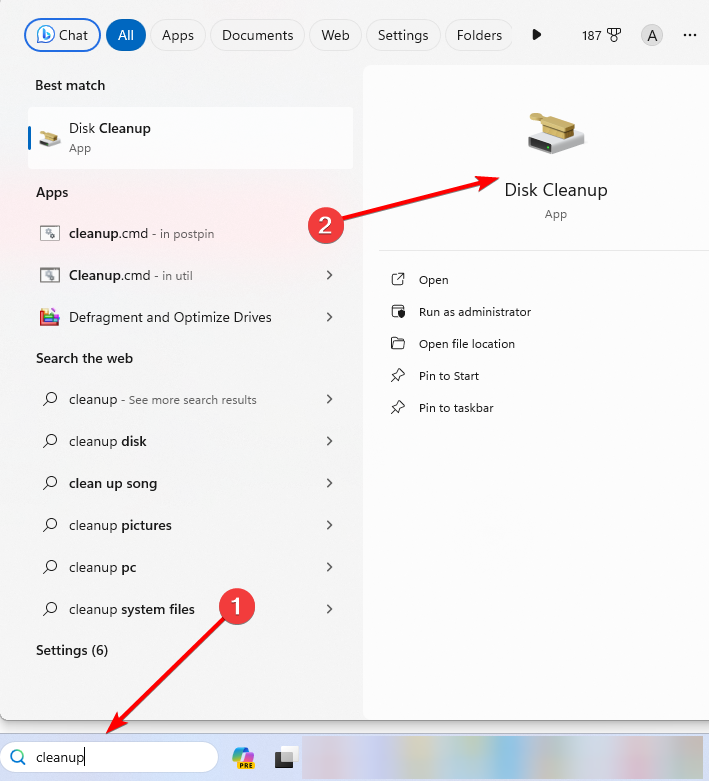
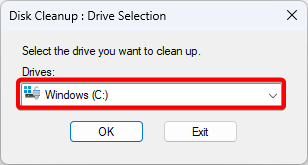
2. Select your drive and hit Enter.
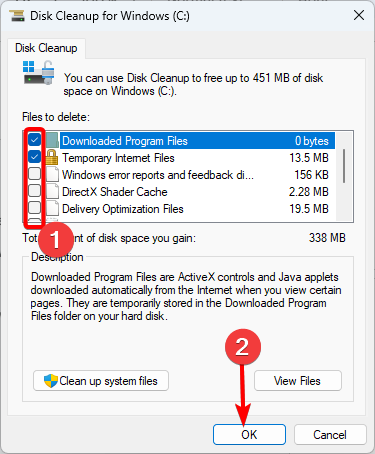
3. Under Files to delete, select as many checkboxes as you want and hit OK.
4. Manage the Page File Size
The page file is a virtual memory file the operating system uses when it runs out of physical memory. On Windows 10 and 11, it is possible to determine the amount of storage allocated for the page file as opposed to allowing the system to allocate it automatically. You may increase the page file size if you have a large amount of RAM and need to maximize system performance.
1. Press Windows + I to open the Settings app.
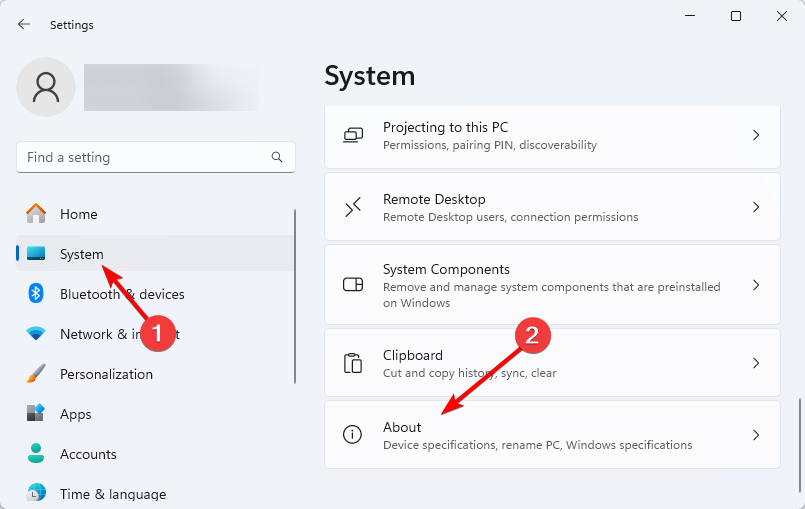
2. Click System on the left pane, then on the right, click About.
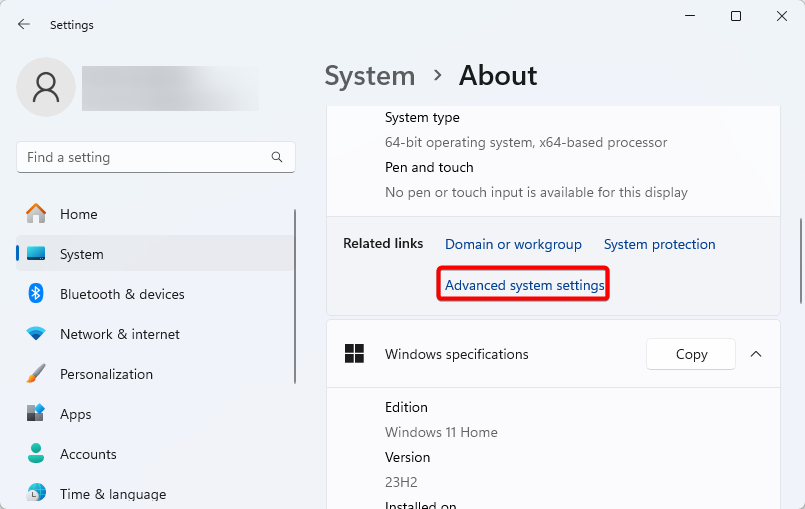
3. Scroll down and click Advanced system settings.
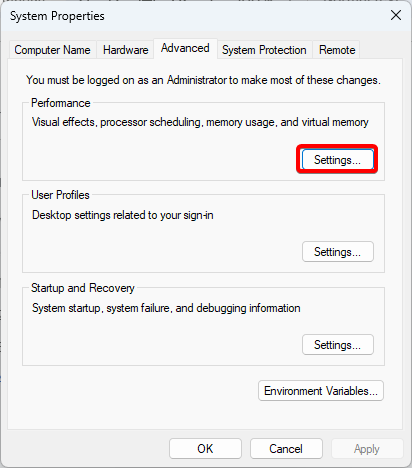
4. Under the Performance section, click the Settings button.
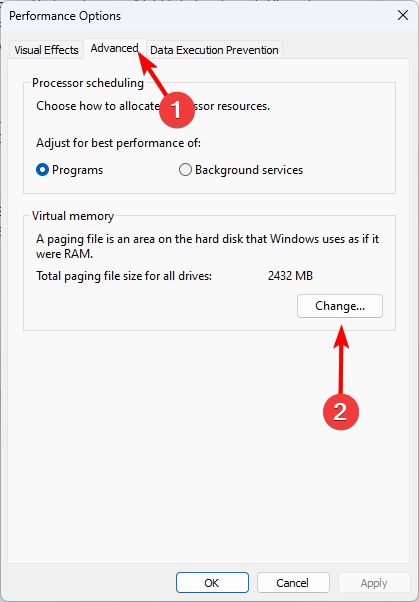
5. Click the Advanced tab and the Change button under the Virtual memory section.
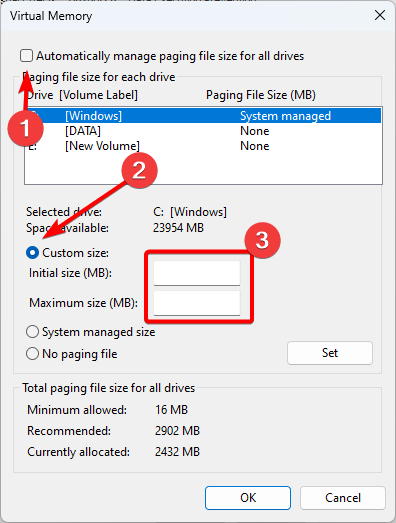
6. Unselect Automatically manage paging file size for all drives, click Custom size, input Initial and maximum sizes, then click OK to apply your settings.
Speed Up Windows 10 and 11 from Startup Programs
1. Disable Startup Programs
Startup programs are applications that are automatically launched when you start your computer. While some may be very important, others can be disabled without any negative effects. Startup programs also contribute to the boot time, and disabling them will produce shorter boot times.
1. Press Ctrl + Shift + Esc to launch the Task Manager.
2. Click Startup apps on the right pane, click a startup program on the right, and click the Disable button.
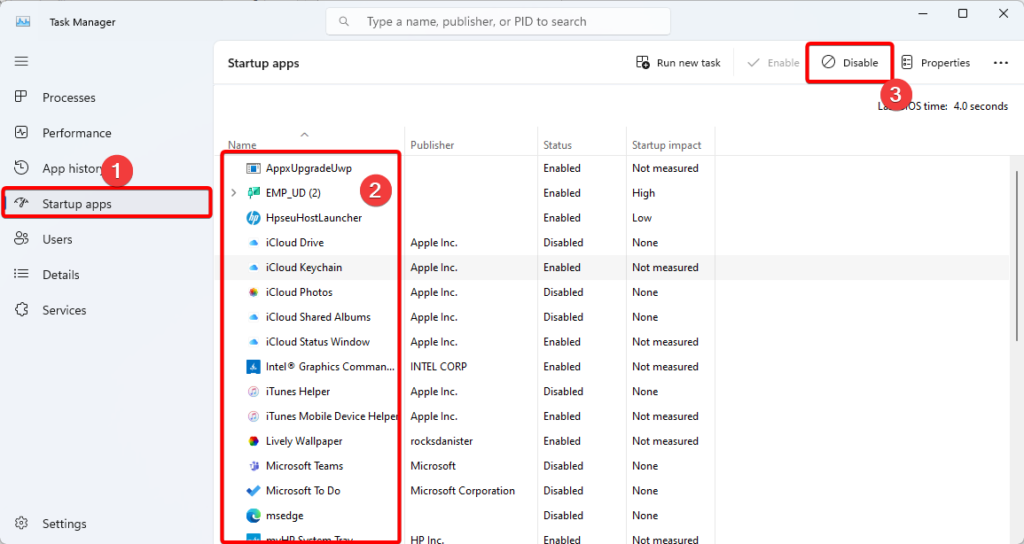
3. You may repeat the steps for as many startup programs as you want.
2. Customize Startup Programs
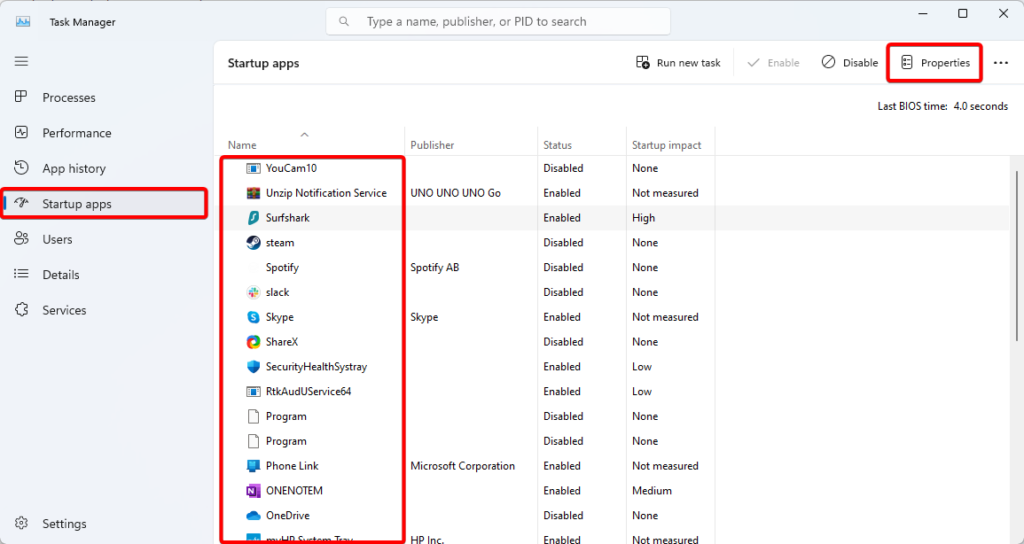
Above, we have explored disabling startup apps, but you may also consider customizing its startup settings if you need a program to start up automatically. This will reduce its impact on performance. A quick example is shown below.
1. Press Ctrl + Shift + Esc to launch the Task Manager.
2. Click Startup apps on the right pane, click a startup program on the right, and click the Properties button.
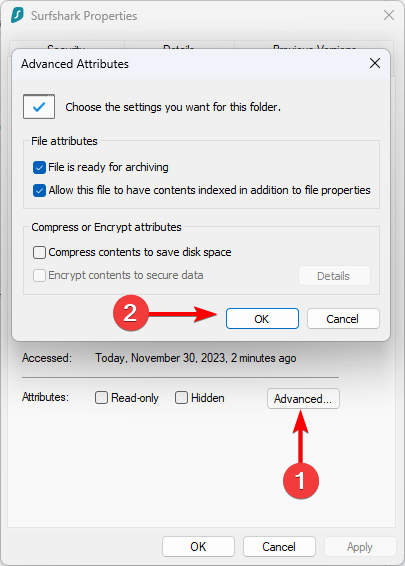
3. Click the Advanced button and check the Compress content to save disk space checkbox.
Speed Up Windows 10 and 11 Using Visual Effects Tweaks
1. Disable visual effects
Windows 10 and 11 use visual effects to make the PC look more attractive. However, these effects are resource-intensive and may reduce performance. This is often more evident on older computers. You may disable them in System Properties.
1. Press Windows + I to open the Settings app.
2. Click System on the left pane, then on the right, click About.

3. Scroll down and click Advanced system settings.

4. Under the Performance section, click the Settings button.

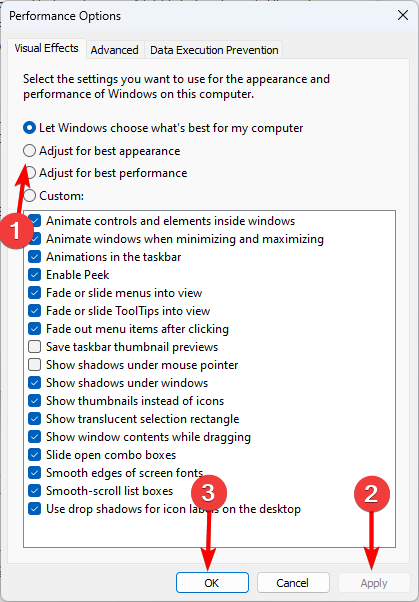
5. Click Adjust for best performance.
2. Adjust Animation Setting
You may also reduce the impact of animations on performance by adjusting this setting in the System Properties of Windows 10 or 11.
1. Press Windows + I to open the Settings app.
2. Click System on the left pane, then on the right, click About.

3. Scroll down and click Advanced system settings.

4. Under the Performance section, click the Settings button.

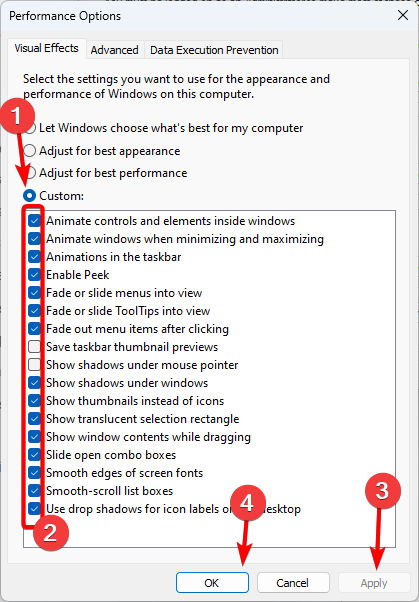
5. Click Custom, uncheck any box next to the visual effects you wish to disable, then click Apply and OK. You may disable the following:
Animate windows when minimizing and maximizing
- Animate controls and buttons within windows
- Fade or slide menus into view
- Smooth edges of screen fonts
- Show thumbnails instead of icons
Speed Up Windows 10 and 11 by Tweaking Background Processes
1. Identify Resource-Intensive Processes
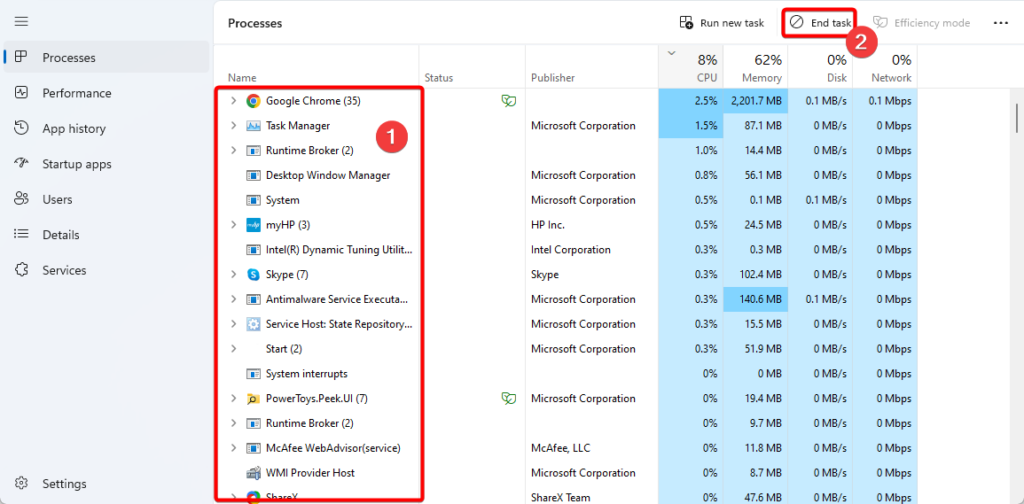
Resource-intensive processes are some of the major reasons for reduced speed and performance on Windows devices. They take up CPU, memory, or disk resources. You may identify some of these processes running in the background and turn them off if necessary.
1. Press Ctrl + Shift + Esc to launch the Task Manager.
2. Click the Processes menu on the left pane, and click on any of the following headings to filter the process by resource used: CPU, Memory, Disk.

3. Click a resource-intensive running process on the right, and click the End Task button.
2. Disable Unnecessary Services
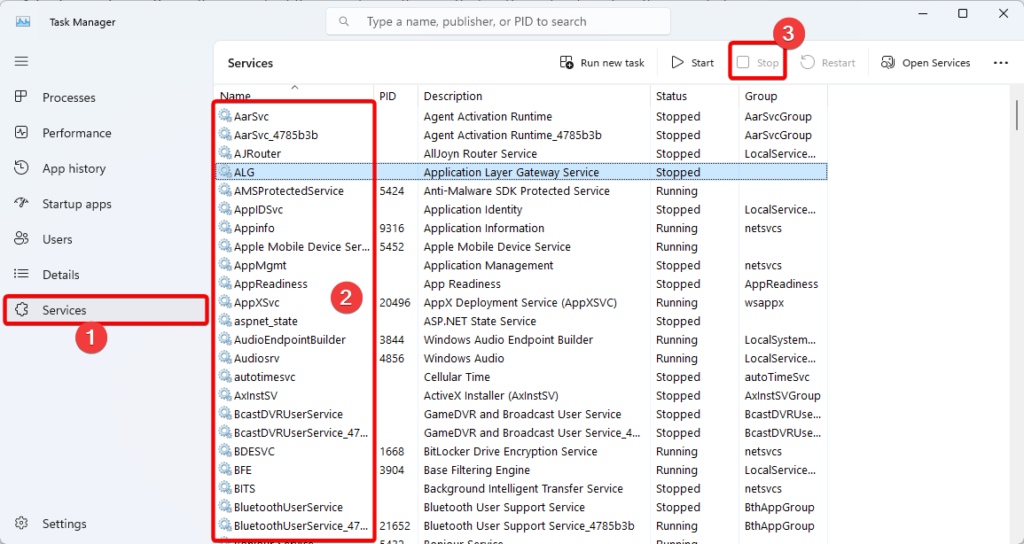
The normal functioning of your computer does not need the use of all Windows services. You can turn off these services to increase efficiency and free up resources.
1. Press Ctrl + Shift + Esc to launch the Task Manager.
2. Click Services on the right pane, click a non-essential service on the right, and click the Stop button.
Speed Up Windows 10 and 11 with Hardware Upgrades
1. Upgrade Your RAM
RAM or Random Access Memory, is one of the most important factors in speeding up your Windows computer. It is an essential factor because it holds data that is actively being used. If you upgrade your RAm, you can manage more open processes concurrently quickly. You should take note of using RAM that matches your system specs.
2. Upgrade Your Storage Drive
An Upgrade to your storage device is another great way to increase speed on a Windows 10 or 11 computer. With more storage, you will reduce the effect of clutter that gathers over time. You can also hold more data without having any noticeable impact on performance.
3. Upgrade Your Graphics Card
Consider replacing your specialized graphics card with a more recent one if you’re using one. Gaming and other graphics-intensive tasks will benefit from improved graphics performance as a result.
Getting the Best Performance from your Computer
While using a Windows 10 or 11 device, the aim should be to optimize performance. The solutions discussed in this guide will help you get the best performance from your device.
Is there anything we left out? Leave a comment in the comment section below. We look forward to hearing from you.
More windows tips:

