Are you looking to sell your PC or laptop? To get the best bargain on the sale, you must follow all necessary steps before even listing it for sale. There are a few things that may put off a potential buyer, and also, there are also a few elements that may put you at risk when handing over a computer you previously used to someone else.
You may be bothered about privacy or simply bothered that your computer is not working well and may not fetch as much as you would hope for. This guide touches on all important points and helps you prepare to sell your computer. We recommend you follow every detail below before selling your computer.
1. Backup Your Data
A pre-used computer means that you already have some of your information or data on the computer. These could be files, music, applications and more. Most users will even have sensitive information such as passwords and usernames. To ensure none of these are totally lost, you must backup your computer.
You may connect an external drive and transfer your important documents or use the built-in account backup option of Windows.
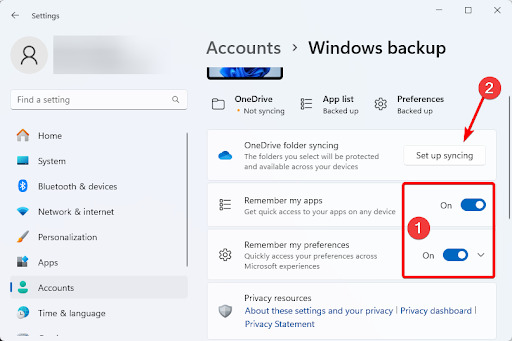
1. Press Windows + I to open the Settings application.
2. Click on Account on the right pane, then on the left pane, click Windows backup.

3. Toggle on the options for Remember my apps, and Remember my preferences, then click the Set up syncing button and follow the wizard to complete the OneDrive syncing configuration.
Alternatively, you may use the control panel backup option on Windows 11 as shown below.
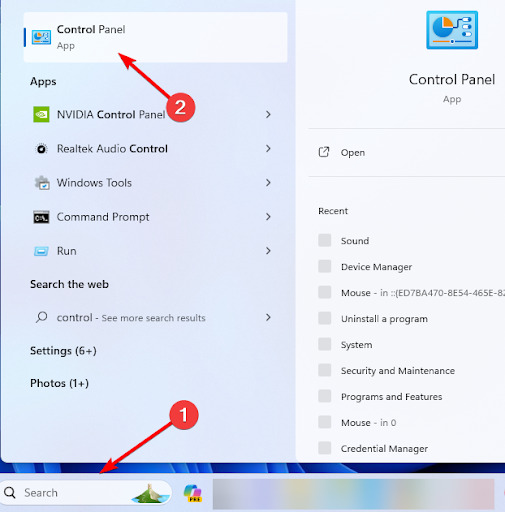
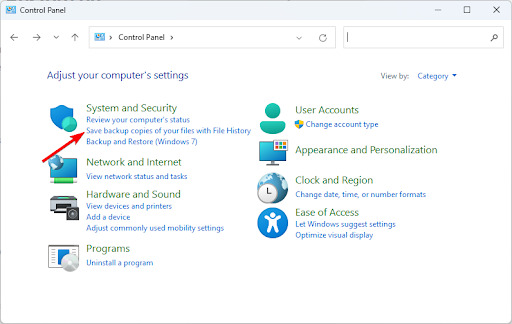
1. Click the Taskbar’s magnifying lens, type control and click the Control Panel option.
2. Click Save backup copies of your files with File History.
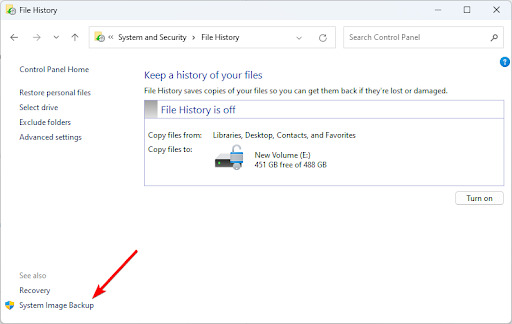
3. On the lower left corner, click System Image Backup.
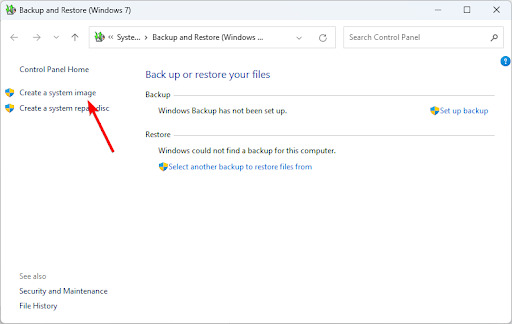
4. Click Create a system image on the left pane.
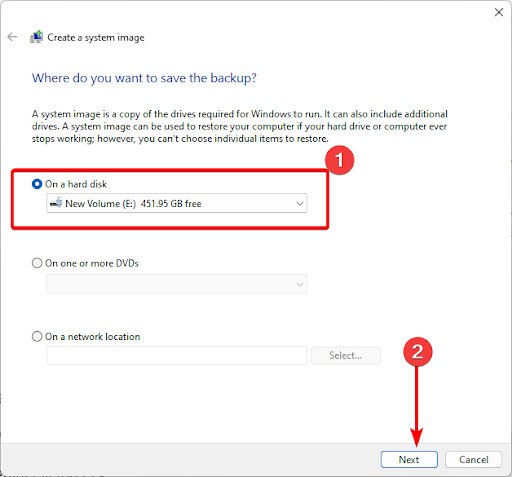
5. Select the On hard disk option, and choose a drive to save your backup from the drop-down then click the Next button.
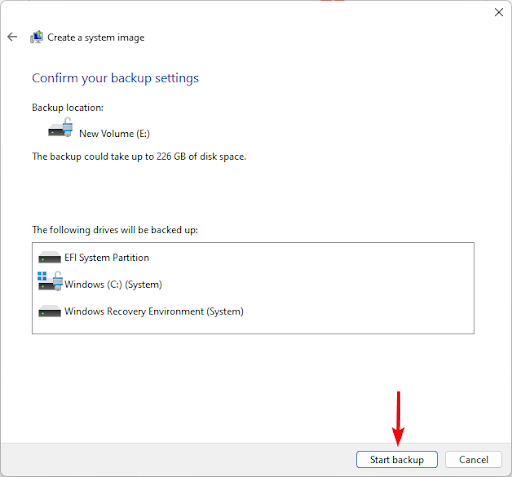
6. Make sure all your system drives you need to back up are selected on the next window, then click Next.
7. Click Start backup.
2. Remove Software Authority
On Windows, Software Authority may come pre-installed. It’s a bundle for PC optimization tools, antivirus, and some other productivity software. You may remove them without affecting your computer, as they are not essential apps. However, the most important reasons to get rid of OSftware Authority are as follows:
- They often include your personal information and are used to display adware.
- They may contribute to slowing down a computer.
- They may not be compatible with every program a new owner will want to install.
Follow the steps below to remove it.
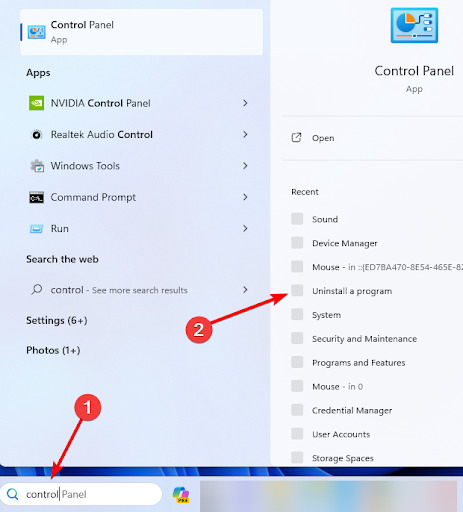
1. Click the Taskbar’s magnifying lens, type control and click Uninstall a program.
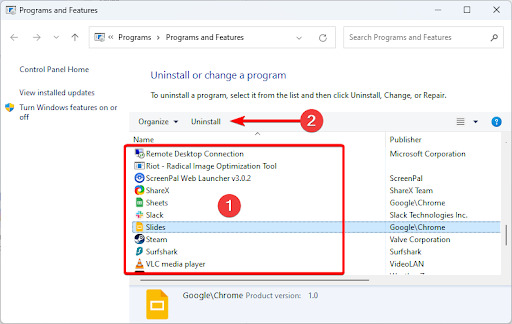
2. Click Software Authority from the program list, then click Uninstall, and follow the wizard to complete the process. (Depending on your computer, this app may come with a different name).
3. Wipe Your Hard Drive
When you wipe your drive, you delete every data. Before selling your laptop Or PC, this is an important step to ensure your information is not transferred to the new buyer. You may wipe the drive by physically destroying it, using a dedicated wiping program, or using the built-in formatting tools.
Aside from protecting your data, wiping the computer will improve performance, as most redundant programs will be removed. Now, let us show you how to wipe a computer.
1. Press Windows + I to open the Settings application.
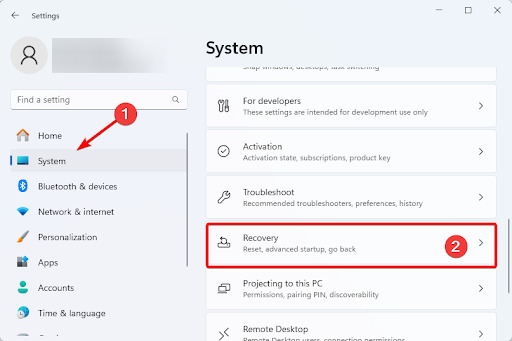
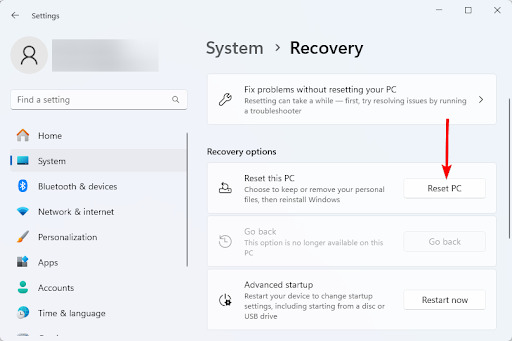
2. On the left pane, click System, then click Recovery on the right.
3. Click the Reset PC button.
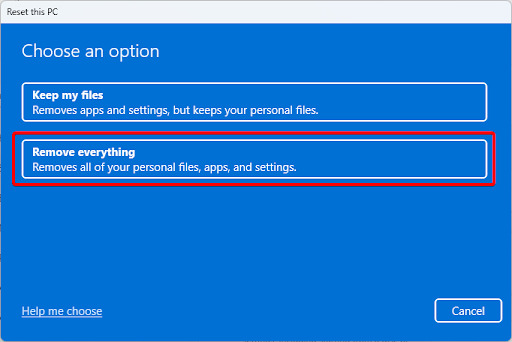
4. Select Remove everything.
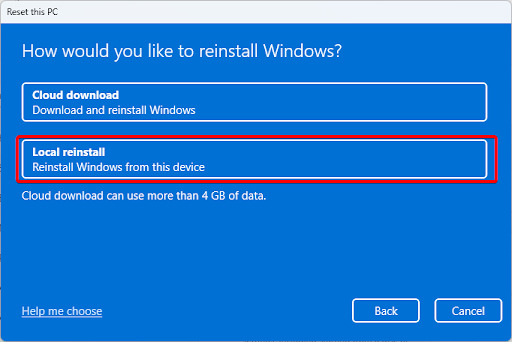
5. Select Local Reinstall.
6. Click Change settings.
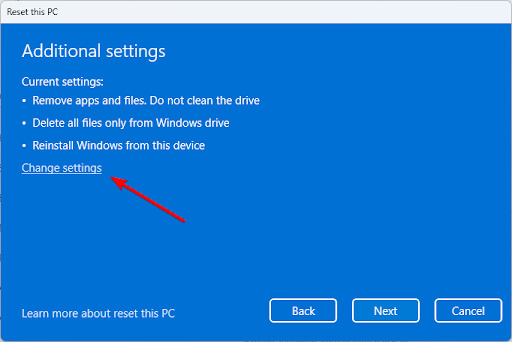
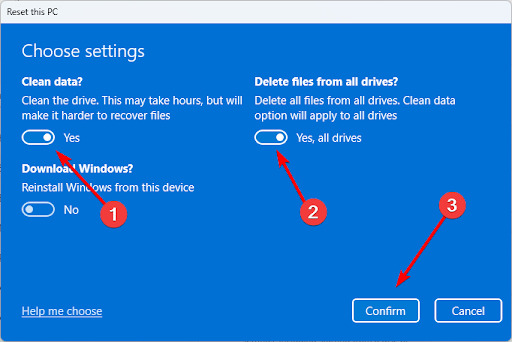
7. Toggle on the options for Clean data and Delete files from all drives, then click the Confirm button.
8. Click Next on the subsequent windows.
9. Click the Reset button and wait while the process starts. It may take a while to complete.

Note that wiping the computer is different from reinstalling the OS. Wiping is our preferred option before selling your computer because it deletes all data on the hard drive, deletes the OS, and deletes installed programs and personal files. While a reinstallation simply loads a new OS but may not delete old data. Also, if you are wondering how to wipe a Windows 10 computer, the steps are similar to the process above.
4. Replace Bad Hardware Components
After using your computer for a while, it may be necessary to replace hardware components that may no longer function perfectly. Some components you may need to replace are the following:
- Hard drive
- Memory
- Battery
- Screen
- Keyboard
- Mouse
Before changing these hardware parts, you may want to check individually if they are in good working condition. Running the Hardware troubleshooter may show you if there are any faults with these components. In addition to that you may want to Windows Memory Diagnostic to scan for RAM faults. We also recommend a physical examination of components where possible.
5. Clean Your Laptop or PC
Before listing your computer, you want it to look as close to new as possible. While all the other steps are more concerned with internal features, cleaning your computer deals with making the body look presentable.
You may use materials such as a soft, dry microfiber cloth, a can of compressed air, and a cotton swab. Note that in this process, you must be as gentle as possible, especially when cleaning with the cloth. You would want to make sure, nothing scratches the screen, and no keys are displaced from the keyboard.
6. List the Computer for Sale
Finally, the last step before you sell your used laptop, is to actually list it for sale. Depending on your location, you will have different options for listing services. You may use online marketplaces like Craigslist, Swappa, eBay, specialized electronics marketplaces, social media, and local classifieds.
Ensure you write a detailed description of the computer. Also, remember to give the listing a clear title like used Windows for sale, and do not forget to add very clear images of the computer as well.
Final Thoughts!
There are so many steps you may want to take before you sell a used laptop, however, the ones outlined in this guide should suffice. They are the most important steps. If you have read through it, you should be ready to sell your computer at the fairest bargain possible.
For more information: