Taking screenshots on your iPhone is a fundamental and useful feature that allows you to capture and save a snapshot of what’s displayed on your device’s screen. Whether you want to capture memorable moments from a conversation, save a webpage, or demonstrate a new app feature, knowing how to take screenshots is essential. In this guide, we’ll walk you through the various methods of taking screenshots on all iPhone models.
1. How to Take a Screenshot on an iPhone Using Buttons
There is no better method for taking screenshots than using the physical buttons on your device. However, iPhone models with Face ID and Touch ID take screenshots in slightly different ways. Pressing the right combination of buttons captures your screen effortlessly.
Taking Screenshots on iPhone X and Later Models:
1. Locate the Buttons:
- Press the Side Button and the Volume Up button simultaneously for iPhone X and later models.
2. Capture Confirmation:
- You’ll hear a camera shutter sound, and the screen will flash white.
3. Viewing Screenshots:
- Access your screenshots in the “Photos” app under the “Screenshots” album.
Taking Screenshots on iPhone SE, iPhone 8 and Earlier Models:
1. Locate the Buttons:
- Simultaneously press the Home Button and the Sleep/Wake or Power Button.
2. Capture Confirmation:
- Similar to newer models, you’ll hear a shutter sound, and the screen will flash.
3. Accessing Screenshots:
- Find your screenshots in the “Photos” app, specifically in the “Screenshots” album.
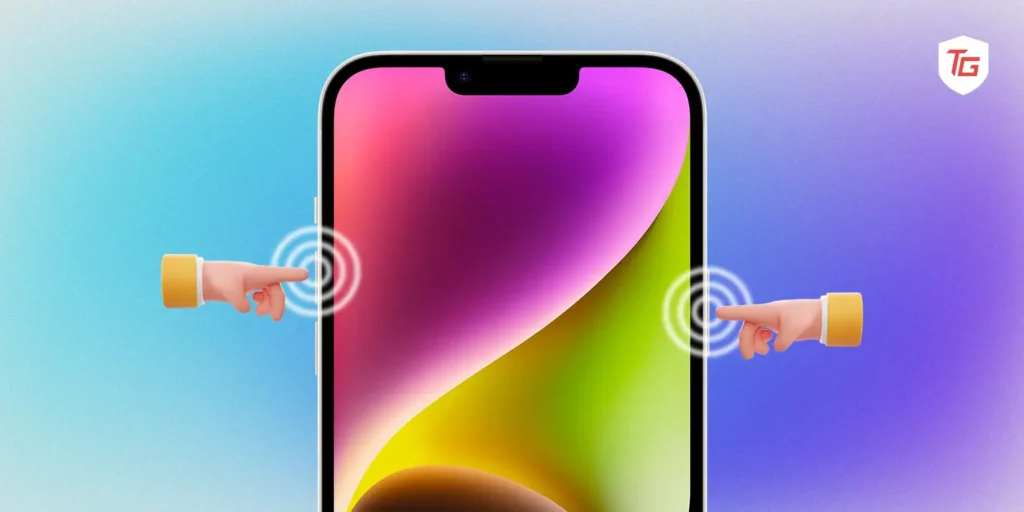
2. Use Assistive Touch to Take Screenshots
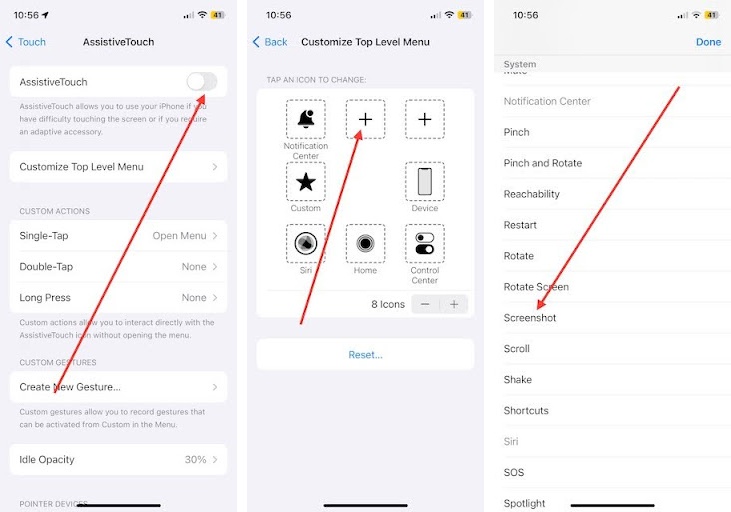
Assistive Touch is a good alternative for users who find combinations of physical buttons difficult. Assistive Touch is an accessibility feature that provides shortcuts to help you use your iPhone more efficiently. It simplifies the process of taking screenshots through a virtual touch interface. Below are the steps to enable Assistive Touch and take screenshots using the feature.
1. Open the Settings app on your iOS device.
2. Scroll down and navigate to the Accessibility menu.
3. Now, tap the Touch feature.
4. Then select AssistiveTouch.
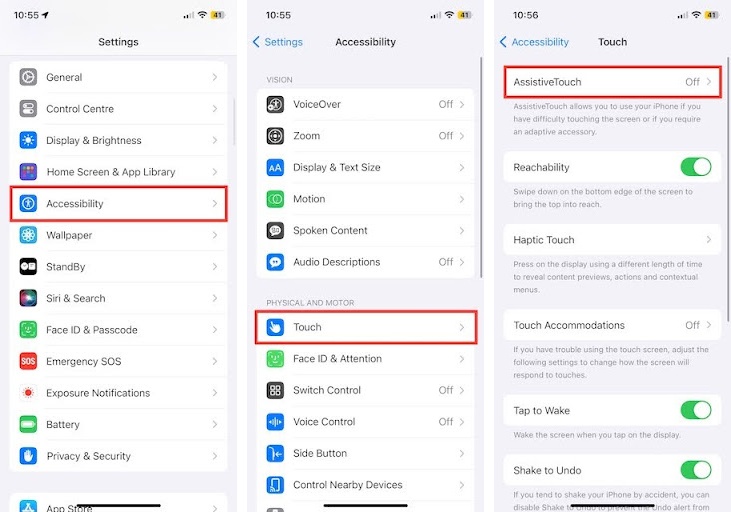
5. Enable the switch for AssistiveTouch.
6. Now, tap Customize Top Level Menu.
7. Tap the + button to add Screenshot to Assistive Touch shortcuts.
8. Finally, scroll down and select Screenshot.
As a last resort, launch the AssistiveTouch menu and tap the custom snapshot icon to take a screenshot.
3. Use Siri to Take Screenshots on iPhones
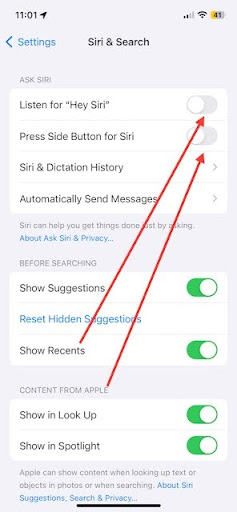
You know Siri pretty well right? Well, you can ask your iPhone’s virtual assistant to take a screenshot of your current screen. To do it, simply say “Hey Siri” or long-press the Side button. Then say “Take a screenshot” to instruct Siri to capture the current screen.
In order for Siri to listen to you, make sure the necessary settings are enabled by visiting the Settings app > Siri & Search > make sure Listen for “Hey Siri” and Press Side Button for Siri switches are turned on.
4. Use Action Button on iPhone 15 Pro Models to Take Screenshots
For iPhone 15 Pro models, the Action Button provides a convenient way to take screenshots. But first, you need to configure the Action button to take screenshots. Below are the simple steps to enable the Action button on iPhone.
1. Find the Action Button on the side of your iPhone 15 Pro or Pro Max.
2. Press the Action Button: a quick press on the Action Button captures a screenshot.
5. How to Take Full Page Screenshots in Safari on iPhone
You’ll be surprised to learn that your iPhone can take full-page screenshots of the web pages you see in browsers like Safari, Chrome, or other third-party browsers. To take a full-page screenshot on your iOS device.
1. Open the Safari browser on your iPhone.
2. Navigate to the webpage you want to capture.
3. Press the Side Button (or Home Button) and the Volume Up button simultaneously.
4. After capturing, tap on the preview at the bottom left and select “Full Page”.
5. Lastly, hit Done and then select Save to Photos or Save PDF to Files to save it on your iPhone.
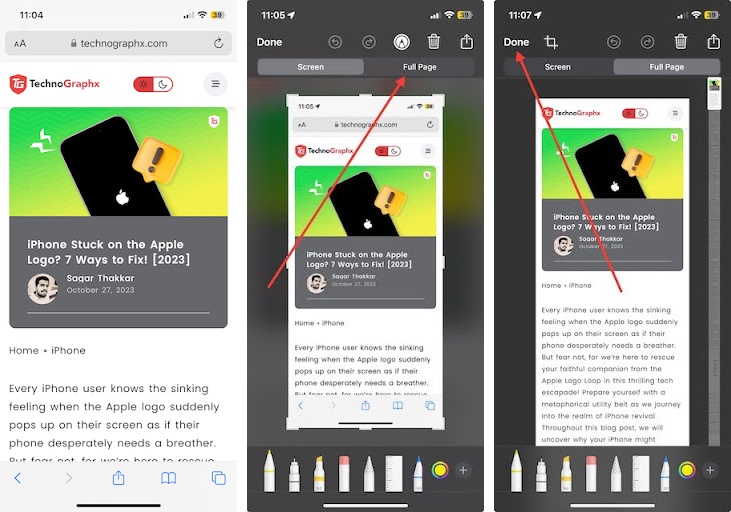

The screenshot can be viewed later on in the Files app or Photos app depending on where it has been saved.
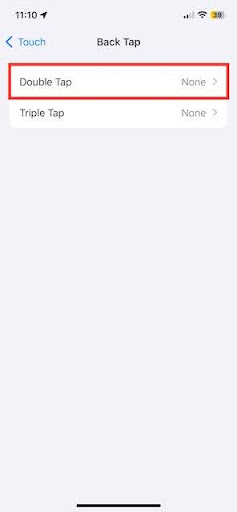
6. Take Screenshots Using Back Tap Gestures on iPhone
You can perform an action on your iPhone by double-tapping or triple-tapping on the back. Now, taking screenshots is as easy as tapping on the back of your device. As a first step, you need to set up Back Tap gestures to take screenshots. Before that, make sure that your iPhone is running on the latest iOS version after iOS 14.
How to enable it,
1. Open the Settings app and tap Accessibility.
2. Now, tap the Touch menu.
3. Then scroll down to the end of the screen and select Back Tap.
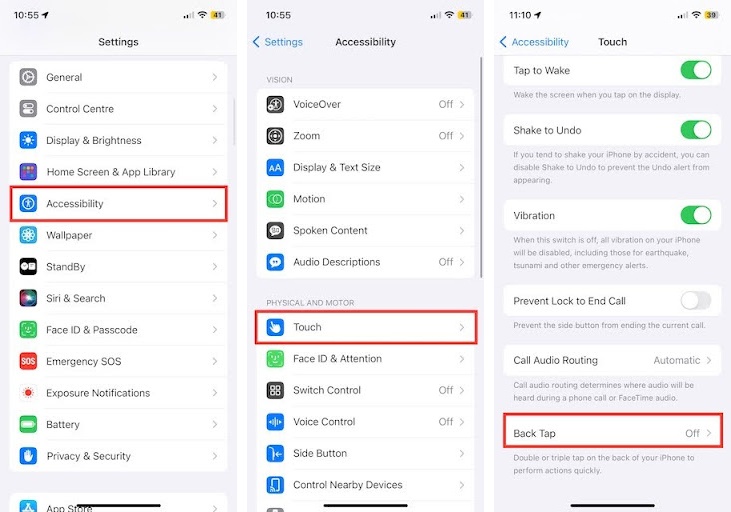
4. Next, choose Double Tap and assign the “Screenshot” action.
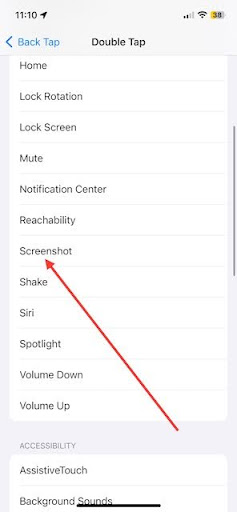
To make sure it works, gently tap on the back of your iPhone twice to capture a screenshot. Alternatively, you can take screenshots on your device using the Triple-tap gesture.
7. Take Screenshots Using the iPhone Shortcuts App
iPhone Shortcuts offers customizable shortcuts, including ones for screenshots, for a variety of tasks. To take screenshots using the Shortcut app:
1. Open the Shortcuts app.
2. Tap the “+” button in the top right corner to create a new shortcut.
3. In the shortcut editor, tap the Add Action button to add an action.
4. Use the search bar to find the “Take Screenshot” action and add it to your shortcut.
5. You can add more actions to your shortcut if you want to perform additional tasks after taking a screenshot (e.g., saving it to a specific album, sending it to someone, etc.).
6. Tap on the “Untitled Shortcut” at the top, and give your shortcut a name.
7. Save your shortcut, and it will appear in the My Shortcuts tab.
8. To run your shortcut, tap on its name, and it will execute the actions you’ve set, including taking a screenshot.
9. Optional: Tap the ellipsis (…) in the shortcut editor, then choose “Add to Home Screen.”
8. How to Annotate Screenshots on iPhone:
With the markup tools, you can add annotations to your screenshots, enhancing their appearance and detail. Whenever you take a screenshot, a screenshot preview will appear in the bottom left corner. Upon tapping it, the preview will open on a larger screen with markup tools. Below are some markup tools you can use.
- Pen Tool: Allows freehand drawing or writing on the image.
- Text Tool: Adds text to the image, enabling you to include annotations or captions.
- Shapes: Offers various shapes like rectangles, circles, and arrows for emphasis.
- Magnifier: Provides a magnifying glass to zoom in on specific details in the image.
- Eraser Tool: Lets you remove unwanted annotations or drawings.
- Color Palette: Allows you to choose different colors for your annotations.
- Line Thickness and Opacity Adjustments: Enables customization of the thickness and transparency of lines and annotations.
- Arrows and Highlights: Adds arrows for directional emphasis and highlights for important areas.
- Undo and Redo: Allows you to undo or redo changes made during the annotation process.
Using these markup tools, you can easily enhance and personalize your screenshots and images.
Conclusion:
Learning how to take screenshots using an iPhone will equip you with a multitasking gadget that can capture and communicate information. With physical buttons, Assistive Touch, Siri, Back Tap gestures, and iPhone Shortcuts as options, these are methods that suit different tastes and disabilities. Try these strategies on the iPhone to determine which is most convenient for your daily routine.
More iPhone Tricks: