Over the years, the Chromebook has become more versatile in managing windows and screens. From snapping to rearranging windows, there is a lot of flexibility. There is simply so much you may do with windows, and an often overlooked feature is its split-screen mode, both in tablet and desktop mode.
In this guide, we will discuss tips and tricks to do split screen on Chromebook so you may have a more productive time. Let us get to it.
5 Ways to Split Screen on a Chromebook…
1. Enable Split Screen Using Snap Windows
Snap Windows on Chromebook allows you to resize applications into different configurations on your display. It helps you see different apps side by side or top to bottom.
To enable this feature, simply follow the steps below.
1. Launch your application.
2. Click and hold the title bar, then drag it to the end of any of the sides and leave it only when you see an outline or shadow on your display.

3. Now, launch another application and perform the same steps, this time dragging it to the opposite corner before letting go. You should now have two apps side by side.
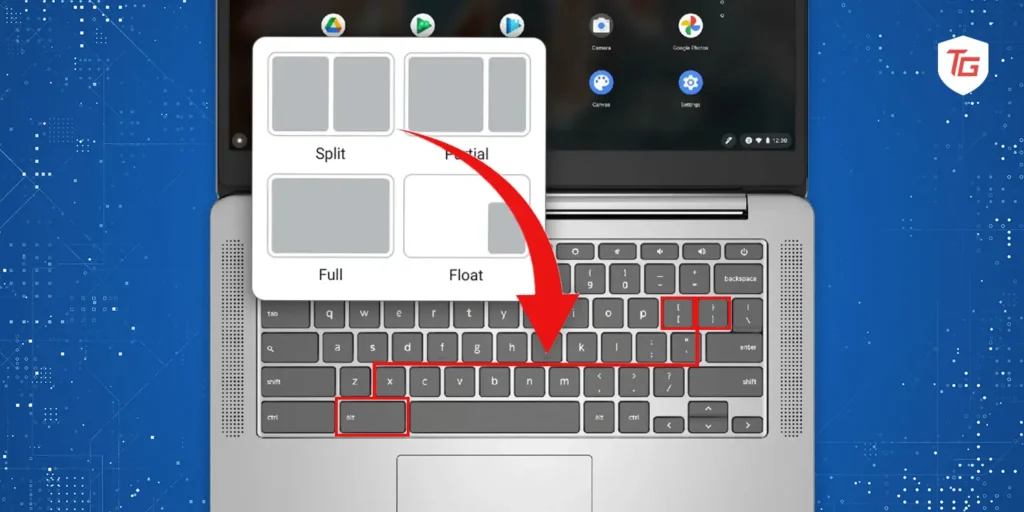
2. Activate Split Screen Using Keyboard Shortcuts
On Chromebooks, keyboard shortcuts are also available for splitting your screen, which might expedite the process even more if you regularly split windows and would rather use a shortcut for that purpose.
The bracket symbol keys and the Alt key are used for the shortcuts. After choosing your window, simultaneously press Alt + [ to lock the window to the left, or Alt + ] to lock the window to the right.
3. Enabling Split Screen From the Overview Menu
Like Windows 10, 11, and Mac, ChromeOS features a separate overview panel that allows you to review the tabs and programs you have open quickly. It allows you to enlarge an application window to occupy half of the screen. Let us examine how this feature helps you split screen on Chromebook.
1. Click the Show key; it often has a rectangle and two vertical lines. This activates the Overview menu.

2. Optionally, swipe up with three fingers on your Chromebook touchpad to activate the Overview menu.
3. To enable a split view, drag and drop the application’s preview window either to the left or right side of the screen.

4. Once it feels one side of the screen, select another and drag to the other side.
4. Performing a Split Screen Using the App Maximize Button
Simple app size manipulations may be done using the buttons at the top right corner of the app interface. You may achieve functionality such as maximising, minimising, or even closing the application.
However, you may also use the maximise button to split the screen on Chromebook, as shown below.
1. Launch your app first.
2. Click and hold the Maximize button at the top right corner of the interface.

3. Drag it to the end of any of the sides and leave it only when you see an outline or shadow on your display.
4. Open a second app and repeat the same steps to stack them side by side.
5. How to Enable Split Screen on Chromebook in Tablet or Tent Mode
On Chromebook, the tablet mode feature lets you use the device like a tablet. In this mode, your on-screen keyboard will open automatically when you flip your screen on a hinge. Then, you may use the device like any other tablet. The tent feature is similar, allowing you to prop up the device like a tent. Once on these modes, you may follow the steps below to enable the split screen. Note that this will apply to 2 in 1 devices.
1. Swipe up on your screen, then hold from the bottom to activate your Overview menu.
2. Tap an app or tab window and move it to the right or left of your screen.
3. Lastly, select a secondary app, and you will able to view them side by side.
Alternative to Split Screen on Chromebook
Using a split screen on a Chromebook device is very convenient and inexpensive since you do not need any extra hardware. However, consider using extra monitors if you want extra flexibility. On Chromebook, you may connect between one and 3 external monitors. This is a handy option that has a few advantages over split screen, including:
- Increased productivity
- Improved multitasking
- Enhanced gaming experience
- Improved aesthetics
Final Thoughts!
That will be all we share in this guide. As you may have noticed, splitting a screen on a Chromebook is quite easy. Since we have not written any solutions in any particular order, you may always try what seems the most practical.
Finally, reach out to us in the comment section if you have any additional questions. We love to hear from you.
More windows tips: