We use the internet to quickly find information, share pictures on social media, and manage our banking tasks – you know the drill! However, this convenience can compromise our privacy as data breaches occur frequently. That’s where a VPN enters the picture. Continue reading to understand what a VPN is and How to setup VPN on iPhone through an app or manual configuration.
What is a VPN on iPhone?
A Virtual Private Network, abbreviated as a VPN, safeguards your data against prying eyes. Imagine a VPN as a highly reliable intermediary that stands between your iPhone and the websites you navigate. Once you establish a connection to a VPN, it constructs a secure pathway through which your data travels.
Consequently, your online activities remain concealed from intrusive hackers, your internet service provider’s prying gaze, and even overly curious advertisers. It’s like surfing the internet waves in your own little cove, far from the crowded shores of the online world.
Beyond its data protection capabilities, a VPN opens the door to accessing content that might be inaccessible or limited based on your physical location. Thus, if you prioritise privacy and the autonomy to traverse the web on your own terms, a VPN is a guardian angel for your iPhone’s internet connection, providing both security and the freedom to explore.
How to Choose a VPN Service
Choosing a VPN that acts as your virtual cloak of invisibility in the online world is easy. Simply keep in mind the points discussed below:
- Focus on Privacy: When choosing a VPN, make sure it’s all about keeping your online shenanigans on the down low. Look for a VPN that has a no-log policy. That means they’re not keeping tabs on what you’re up to.
- Speed Does Matter: Slow internet is like slow-drip coffee. Not enjoyable at all. Choose a VPN that won’t put the brakes on your internet speed. Some VPNs slow things down, while others keep the pedal to the metal. Go for the latter.
- Location: No, we’re not talking about your next vacation spot. It’s about where the VPN servers are hanging out. More servers in more places mean you can pick a virtual location almost anywhere. Want to surf the web like you’re in Tokyo? No problemo!
- Security: Think of a VPN as your online bodyguard. Look for one with robust encryption (don’t worry, you don’t need to know how it works, just that it does). It’s like having a secret handshake that only you and the websites you visit know.
- Price: There’s no need to break the bank for a VPN. There are plenty of options at various price points. Just remember, cheap doesn’t always mean good, and expensive doesn’t always mean the best. Find the sweet spot for your wallet.
- User-Friendliness: You’re not in the IT department and don’t want to feel like you are. Choose a user-friendly VPN with an easy setup and a simple interface. It’s like picking a smartphone; you want it to work without a tech degree.
- Customer Support: No one likes being stranded on an online desert island. A good VPN comes with solid customer support. Look for one with quick response times if you encounter a virtual hiccup.
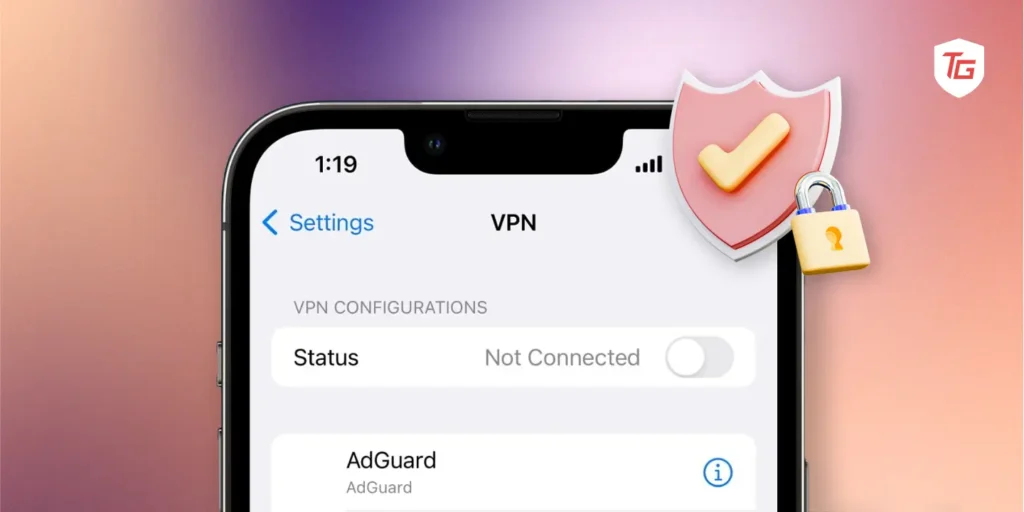
How to Setup VPN on iPhone
- Launch the Settings app on your iPhone or iPad.
- Select General from the options.
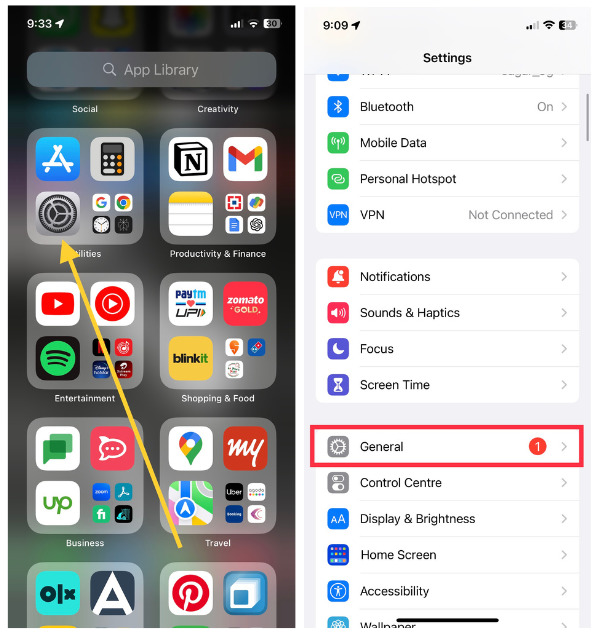
- Scroll down and choose VPN & Device Management.
Note: Select the VPN client you want to use if you have multiple. - Toggle on the switch next to Status.
How to Manage VPN on iPhone
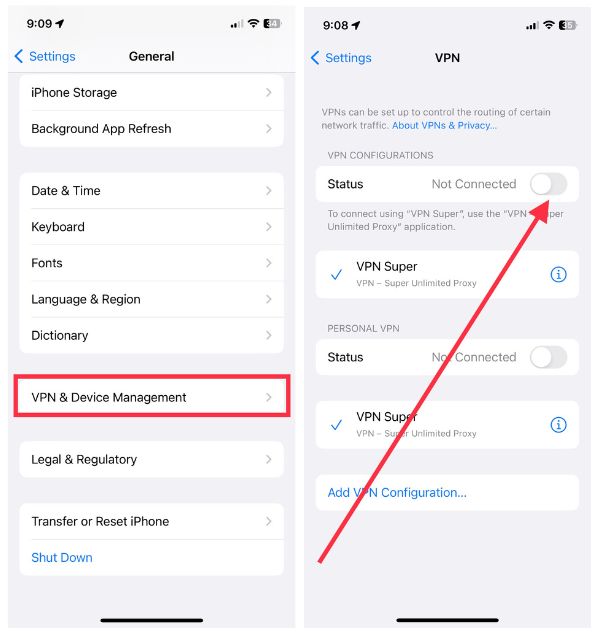
- Open the Settings App on iPhone or iPad.
- Tap General from the options.
- Go to VPN & Device Management.
- On the next screen, tap VPN.
- Choose Add VPN Configuration…
- Tap on Type and pick the VPN protocol you want to use (like IKEv2, IPsec, or L2TP).
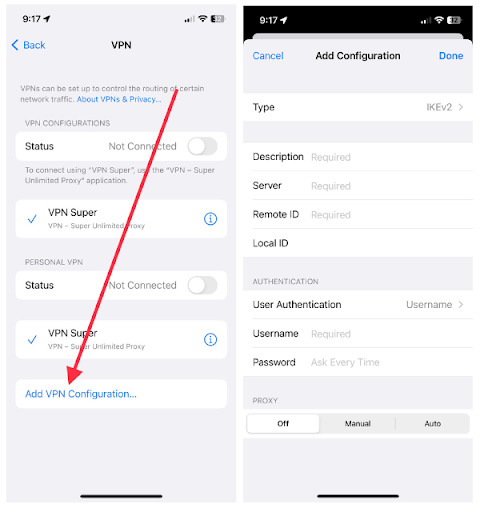
- Add Required Information in: Description, Server, Remote ID, Local ID
- Now select User Authentication and select None, Username, and Certificate.
- Enter your Username and Password, Certificate, or enable the Usage Certificate toggle, depending on the choice above.
- You can set the Proxy to Off, Manual, or Auto.
- Tap Done.
- Enable the Status button to connect to the VPN.
Benefits of a VPN on iPhone
Some of the benefits you can enjoy with a VPN turned on for your iPhone and iPad are as follows:
- Keep Your Stuff Private: A VPN is like your invisibility cloak online. It hides your internet activities from nosy folks like advertisers and hackers. So, what you do on your iPhone stays between you and your apps.
- Wi-Fi Peace of Mind: Ever connect to public Wi-Fi at a coffee shop or airport? A VPN locks down your connection, ensuring that even if someone tries to snoop, they won’t get squat. Your data is encrypted, so it’s like sending secret messages that only you and your intended recipient can understand.
- Unlock the World: Imagine you’re on a trip and want to watch your favorite show, but it’s unavailable in that country. Bummer, right? Not with a VPN. You can virtually teleport your iPhone to a different country and access content like a local.
- Dodging Digital Price Tags: Did you know some online prices change based on your location? Sneaky, right? A VPN can help you get around this trickery by browsing like you’re in a place where the price is lower. It’s like finding a hidden discount aisle.
- No Snooping on Online Shopping: Ever searched for something to buy and then suddenly ads for that exact thing started haunting you everywhere? A VPN stops this. Ad trackers can’t follow you around like lost puppies because they can’t see where you’re really browsing.
Conclusion:
Please do not use a VPN to pirate material or indulge in illegal activities. It is crucial to emphasize that we do not endorse the use of VPNs for such objectives; the goal of this essay is strictly informative. If you have any more questions, please leave a comment, and we will react as soon as possible with a solution.
Keep Reading:–