NVIDIA: this name might not be known for some but people fond of PC games might be well-versed with this. It is nothing but a big corporation that has redefined modern computer graphics. Moreover, GPU has been the source of the next AI as it has shown tremendous characteristics of being the brain of the computer and auto-driven cars. Let’s see how to reinstall nvidia drivers.
Drivers: This word might perplex you a bit but it does the work of gathering multiple files to communicate with the operating system. Without it, the computer fails to send and receive the signal to the hardware devices.
Now, you might be thinking about why there is a need to Reinstall Nvidia Drivers. Well, you might need to reinstall the drivers if you’re facing issues running any computer game. It is crashing in between or you want to reinstall the graphic drivers because your computer acts slow.
Today, we will show you the various methods on how to reinstall Nvidia drivers. Just check it out and you will get to know how you can easily do it on your pc.
How to Roll Back Nvidia Drivers?
Well, there are two steps in reinstalling the drivers in which uninstalling is the first one. User needs to uninstall the drivers first and then in the second step, they can install the drivers in different ways.
If you do not uninstall it firsthand, all your efforts might go in vain. Reinstallation processes are quite simple and just require a little bit of computer erudition along with browsing the internet. The following are the guided steps in reinstalling Nvidia drivers.
STEP 1: Uninstalling the Nvidia Drivers
You can uninstall Nvidia drivers through the device manager. The device manager is an application in your control panel that allows users to modify the drivers and devices in their system. We can roll back, update or reinstall the drivers from here as per the need of the occasion.
Follow the steps carefully for uninstalling the drivers from your PC:
1. Invoke the run box by pressing the Windows and R buttons together. The Windows button is located to the left of the leftmost ALT key.
2. Enter devmgmt.msc inside the run box followed by entering and it will open up the Device Manager.
3. Double click on the Display adapters and it will show up the graphics card installed on your system. Right-click the system GFX and click the Uninstall device. In some systems, it might be only Uninstall.
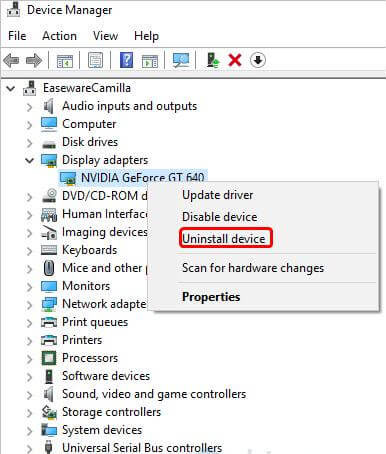
source:drivereasy.com
4. Then the uninstall driver dialog box will appear. Checkmark on the Delete the driver software for this device and then proceed to uninstall. This option will allow users to delete the Driver Store’s driver package.
If we do not see this option, it may happen that the driver package has already been removed. In this case, there is no need to worry and just click on the uninstall button only to proceed further.
After uninstalling the drivers, proceed onto the next step to install them again and finish the process of reinstallation.
Also Read: 6 Excellent Solutions To Fix Nvidia Control Panel Not Opening Issue
Step 2: Installing A Nvidia Driver
- There are two methods most commonly used for installing the Nvidia driver. Here we will be showing step by step procedure of both the process. In the first method, Download and install the driver from the official Nvidia website. You will need to check your system version and the graphics card model. Then refer the steps in the following guide for its manual installation.
- The other method we will show is using a third-party app for the reinstallation of the driver. This method can save you time and can reduce your load as it automatically detects your system version and required drivers to update or modify. If you lack basic computer knowledge then the software will take the command.
Method 1: Downloading And Installing Drivers From Official NVIDIA Website
We need to visit their official website with some prior knowledge about the system and the graphics card. Follow the basic steps mentioned here for easy installation.
1. Visit NVIDIA’s DRIVER DOWNLOAD PAGE on their official website.
2. Enter the required information about the version of the system and the model of graphics your machine has. Enter the operating system version and the bit usage as well as the series of graphics cards being used by you.

source: twblogs.net
3. Now, there will be some instructions guided up on the screen. Follow them for the successful completion of your task.
4. Double click the file that has been downloaded and it will make the drivers installed on your device.
Method 2: Reinstall The Graphic Driver With Third-party software:
There are several good third-party software available that can manage all the work on its own and will detect the version of the system and graphics card model. You need not take the risk of downloading the wrong drivers and installing them. Follow the general procedure as shown below for installing this software and installing the drivers via it.
1. Download the third-party software.
2. Run the software and scan the system. This will allow the app to scan through the system to find any ticklish drivers.

source: systweak.com
3. There will be a detailed list of drivers that requires modification.
4. Update them as per your need and boom, your work is done. The third-party application will fix all the problematic drivers and your system will be refreshed with the updated version or the reinstalled ones. Note that some systems might require a restart to apply the change.
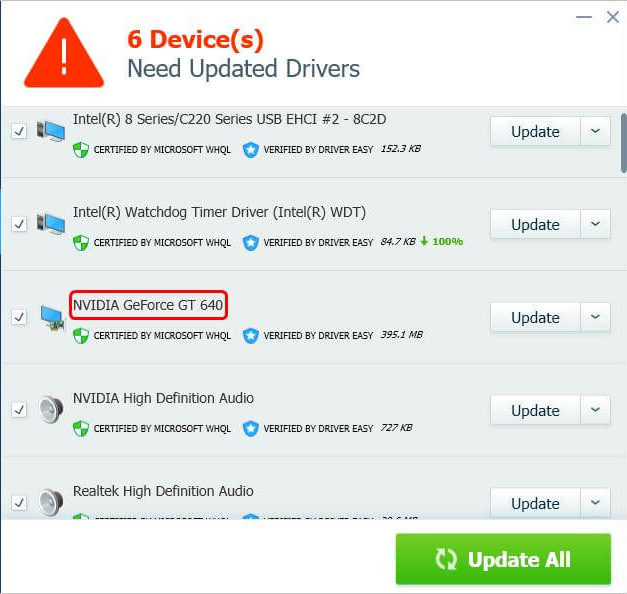
source: medium.com
5. Some third-party software might give you the list and then you have to install them on your own, while in their pro version they do it all for you in a single click.
Just search on the Internet for Driver installation software and you will find numerous ones. Go for any of them that you find suitable.
source: softpedia.com
So, here was an overview on how to reinstall the NVIDIA drivers. Follow the above methods and get the drivers reinstalled on your system and solve the problem that you are facing. For more information, visit Technographx.


