You have just bought one of the latest shiny M1/M2 MacBooks and want to connect a printer. In order to print out your projects, work PDFs, and other important documents, adding a printer to your Mac can be a little tricky. So, what do you do now? Who do you turn to get the best answers?
You have come to the right place with your burning question, “how to add printer to Mac,” as we have the best answer with the proper steps to set up a printer on Mac. Let’s begin.
How to Add a Printer to a Mac?
Adding a printer to your Mac can be done through the System Preferences, a gear-shaped icon on your doc. The “How to add a printer to a Mac” question has a simple answer, more than you think. Let’s go over each step.
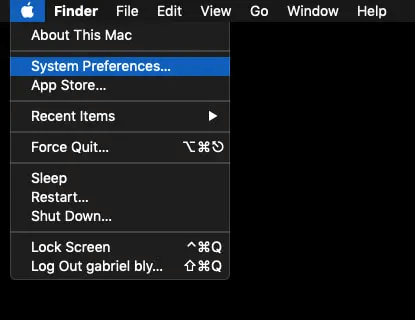
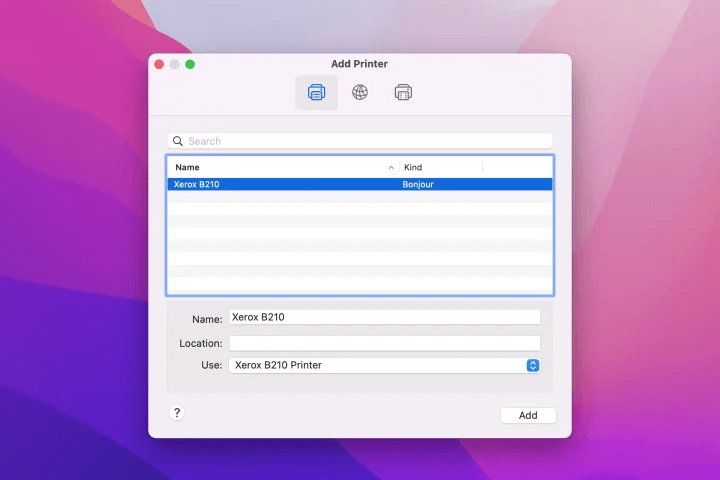
- You can start by selecting the Apple icon, selecting System Preferences, or clicking on the grey Gear-shaped icon on your dock.
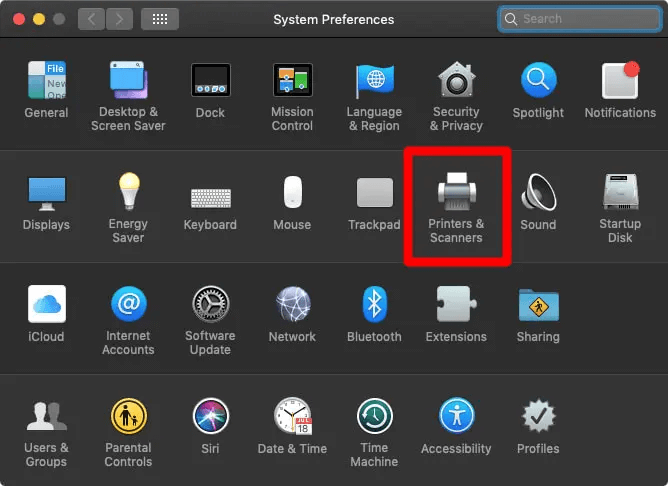
- Search for “Printers and Scanners” in the Preferences menu and click the menu. You will find the list of all the printers and scanners on your left. If you have already connected printers before, you will see them in the list here. The same goes for if you have connected it using a USB cable.
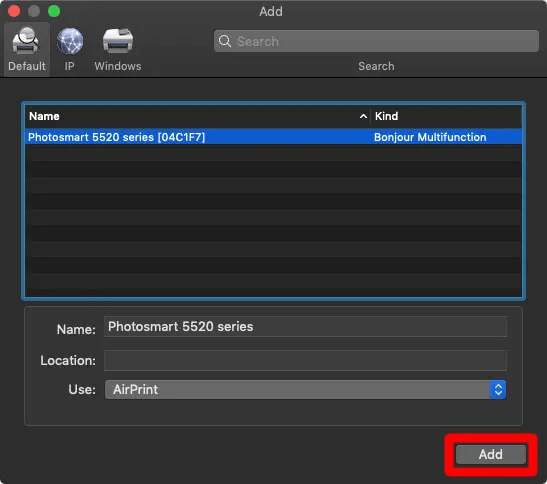
- If, in case, you don’t see your connected printer here, at the bottom of the Printers and Scanners menu, select the ‘+’ sign to add this new printer.

- Select the desired printer in the adding menu, and your done
If this method doesn’t work for you, continue reading below for other methods to add a Wi-Fi or Bluetooth printer, among other vital distinctions and steps.
Add a Wi-Fi or Bluetooth Printer
The following important method concerns Wi-Fi and Bluetooth printers. The methods are similar whether you are connecting to your home Wi-Fi or office Wi-Fi. To know how to connect mac to printer via Bluetooth, you should have the option to connect through Bluetooth devices. Following are steps to add any of the Wi-Fi or Bluetooth printers:
- Check if Bluetooth is turned on on your MacBook and the printer. A button with such devices makes them discoverable; remember to click on that.
- Find the default tab in the Printers and Scanners tab and select ‘Add Printer .’You can find this option in the ‘Add Printer’ video.
- You can select the Wi-Fi or Bluetooth printer from this list. However, you can also search from the Search Box if you know the name.
- Connect to the selected printer. In some cases, you might need to specify the location of your printer in your office.
- Next, you must select the software you can use for your printer. You can do that by opening the ‘Use’ drop-down box.
- You can also choose ‘Select Software’ and select the app you want to use as your default app from the list of apps.
- Finally, select ‘Add’ after you have decided.
The following method is for “how to connect Macbook to printer wirelessly” users who only want to connect their MacBook via Wi-Fi.
- Typically, you must press the Wi-Fi button on your printer first.
- The 2nd requires you to press the WPS button on your Wi-Fi device so the printer can be detected or connected to the Wi-Fi device.
- After the WPS process, click on the Apple main icon at the top of your screen.
- Click on the System Preferences
- In the System Preferences or System Settings menu, look for the System Preferences option.
- Click on the ‘Printers and Scanners,’ a printer icon. In older systems, the option’s name is ‘Print and Scan,’ which you can find under ‘Hardware.’
- Select the printer that you want to use for your printing jobs
- If you don’t see your printer in the ‘Printer and Scanners’ list, click on the ‘+ .’Sometimes you can see your printer is already showing the printer, which is mainly detected conveniently in one of the ‘Add Printer’ or Scanner submenus. You can see if there is more than one printer that you can find in the discoverable printer’s option.
- You can select an option in the printer’s software
- Sometimes the printers support the Air Print, but you can check whether the drivers are now on them. Download the latest driver and install it on the printer.
- Clock ‘Add’ to add the Wi-Fi printer.
Add a Network Printer with Its IP Address
The 2nd method is if you don’t see a printer, but it is connected to your network, please follow the following steps to set it up to Add a network printer with its IP address:
- Select the ‘IP Tab’ from your ‘Add Printer’ window to enter the required details.
- You need to add the following information into the fields to make the printer added to the list of printers.
- Address – Enter the IP address in this field which can also be the hostname of the said printer
- Protocol – There are many methods or protocols a printer supports to connect to other devices on the network, like AirPrint or Internet Printing Protocol and others. Choose one of the appropriate ones.
- Queue – Check the queue number from the printer’s manual, or if it isn’t available, ask the manufacturing company that sells these printers. If you work in an office, ask for this information from the IT team. You can also leave this field blank if your printer doesn’t have the queue number, which you can find on their website or internet forums.
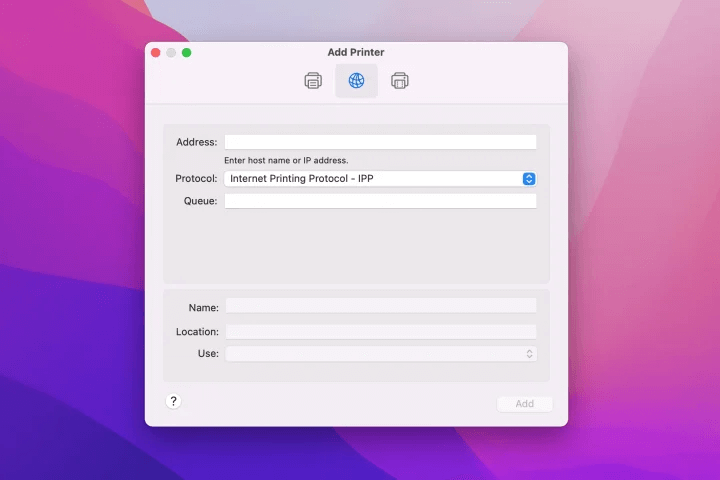
- This step is the same as the method mentioned above, i.e., adding the name and location of the printer.
- Now you can select the app or software from which you will be printing the data using the ‘Use’ drop-down menu.
- After selecting the app, click the ‘Add’ button to complete the answer to the “how to add printer to Mac” question.
Add a Printer Connected to Windows
In this method for “how to add printer to Mac,” you may need the sharing from the printer that is most probably connected to Windows. This happens when the server machine runs on a Windows-based server or most computers on your office’s network are Windows computers. Follow these simple steps on how to connect printer to Mac:
- Communicate with your IT team to get the ‘Workgroup Name’ of the printer.
- You may need the login and password information for the network to connect to the printer. Ask your IT for these credentials.
- Go to the ‘Add Printer’ window and choose the ‘Windows’ tab
- You will see the ‘Workgroup’ option here in this menu. Here select the corresponding name given to the network, which you can also enter on the right side of the Workgroup menu option
- You may need to enter your Username and Password here. If asked, enter these credentials.
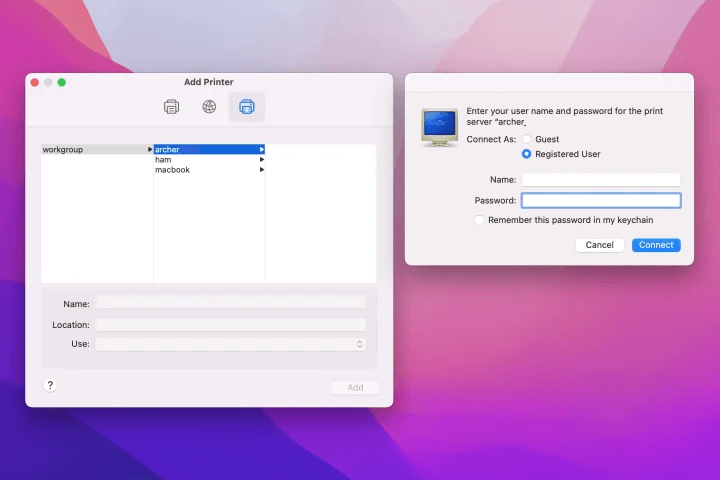
- Enter the name of the printer in this step. You should add the location of the printer if necessary.
- Similar to other methods, select the ‘User’ to add the printing PDF tool to print.
- Click on the ‘Add’ button, and the System Preferences will add your printer.
Finish Setting Up the Printer
This is the final step or method for the ‘how to add printer to Mac’ query. After following one of the methods above to add the printer, you may be asked to add additional settings for your printer device. In the MacBook, you can again go to the ‘Printers and Scanners’ settings menu option to select the default printer that you just connected. Here you can also select the paper size to fix your printing preferences.
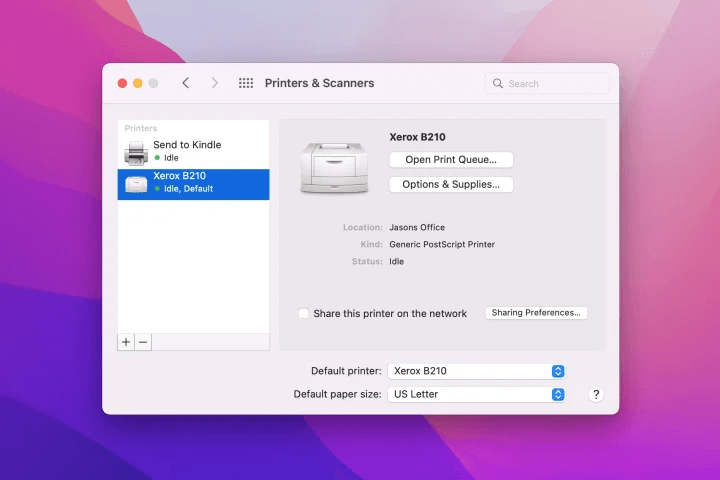
If you want to dabble in more printer settings and printing job settings, you can double-click on the added printer from the list and choose the ‘Settings’ option. There are many options, such as printer features, toner level, and support, or for accessing the printer web page. The settings are specific to the selected printer and may differ from other setting options. Here you can see tips for better using MacBook.
How to Uninstall a Printers from Your Mac
You have learned different ways how to set up printer on Mac, but there are times when you already have a lot of printers installed and some with the same name. In this case, if you want to remove a lot of or a single unused printer from the list, you can do it in the following ways:
- Open the Settings or System Preferences menu and go to the ‘Printers and Scanners
- From the list of printers shown here, select the ones you want to remove from the list.
- Click on each printer and click ‘-‘ to remove the printer
- Click on the ‘Confirm’ popup and delete the printer.
Conclusion
In this article, we shared many different methods on how to install printer on mac. If you are considering buying your 1st home printer or upgrading your old one, we recommend choosing a printer that supports AirPrint. With AirPrint-enabled printers, you can save a lot of unnecessary steps. Furthermore, the Mackbook will automatically upgrade the software.