
There is no doubt that Minecraft is one of the most popular games ever, then again how would it not be? The game has a wide platform with its availability on pretty much every platform, from PC to Mac, and even iOS and Android. It runs well on every device, but it could always be better than that, because as they say ‘the bigger, the better’, likewise, if you have got a PC with a lot of RAM to take benefit of, the experience of playing this game is going to be pretty much excellent, to say the least. Let’s see how to allocate more ram to minecraft?
I think we all remember the days when it was rather intricate to allocate more RAM in Minecraft, but the release of the third-party ATLauncher has definitely acted as a knight in shining armor for us damsels in distress and rubbed off the intricacy of allocating more RAM. In this article, we are going to take a quick glance at how to allocate more RAM in Minecraft on PC, and also for those who run Minecraft on a server.
About
Here is how you can assign more RAM into Minecraft with some easy-peasy-lemon-squeezy steps. Just read the steps carefully, perform them on your system and allocate more RAM to Minecraft quickly.
Source: online-tech-tips.com
- First and foremost, make sure you have got the latest version of the game installed. (That’s like a basic step.)
- Thereafter, check the total RAM of your computer by going to Start > Settings > System > About.
- Now, download and install ATLauncher.
- Once installed, open the ATLauncher app.
- On the right-hand side of the launcher, you’ll see Settings, select the available option.
- Now, select the Java/Minecraft tab.
- Now, simply input the amount of RAM you would like to use (make sure to put it in MB, not GB) in the Maximum MemoryRam field, or use the arrows to adjust the value by 0.5GB at a time.
- Lastly, click Save.
And that was surprisingly all you have to do for assigning more RAM into Minecraft. The next time you load up Minecraft, it will use the explicit amount of RAM you allocated.
Also Read: 5 Excellent Solutions to Fix the Minecraft Keeps Crashing Issue
How to Allocate More Ram into Minecraft Server:
The procedure of adjusting the amount of RAM Minecraft takes when held on a server is slightly different than the aforementioned one, as it is done without the help of ATLauncher. Though, don’t worry, as it is not as complicated as it seems.
Let us get going with the easy steps of the six-step long procedure:
- First of all, open your Minecraft server directory (which is the folder that contains the Minecraft_server.exe file you launch your Minecraft server with). If you are still uncertain about the location, then simply search ‘Minecraft_server’ on your PC.
- Then, click Home > New Item > Text Document on PC to create a text document in the server directory.
Source: partitionwizard.com
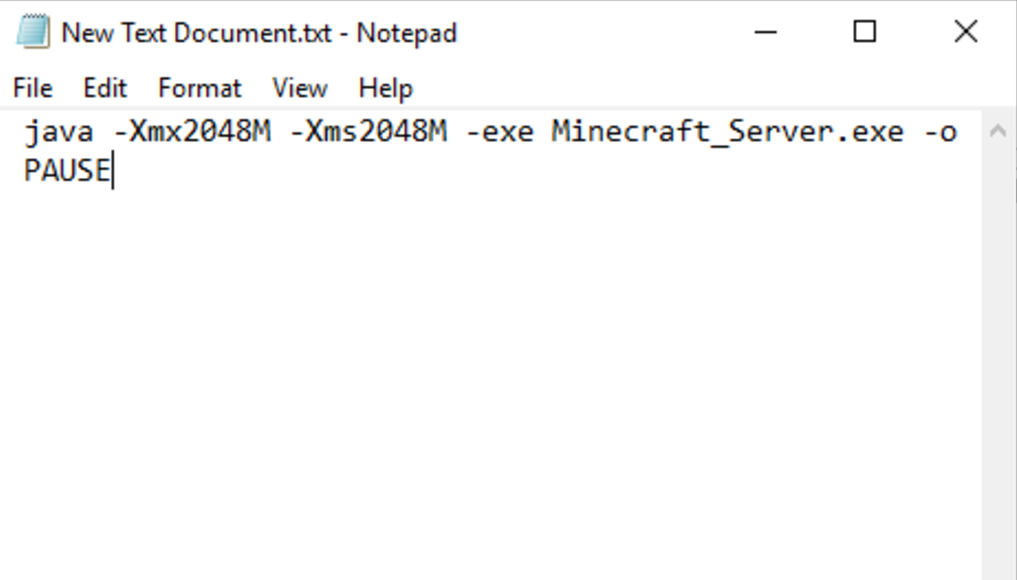
- After that, you just have to open a new text document, and paste the following (if you are using PC):
java -Xmx####M -Xms####M -exe Minecraft_Server.exe -o true
PAUSE - Make sure to replace the ‘####’ with the value (in MB, as said before), that you want to allocate. For instances, if you want to allocate 1GB of RAM, you will have to enter 1024MB, similarly, if you want to allocate 2GB of RAM, you will have to enter 2048MB.
- Then simply, click File > Save As … and change Save as type to All Files. And name the file server launcher and change the extension of the file from .txt to .bat.
- The file that you created will now be the brand-new launcher for your Minecraft server. Just double-click it if you want to run it. Using the .bat file to launch the server helps in automatically allotting the explicit amount of RAM you have decided upon.

Source: futurecdn.net
Conclusion
That was all about ‘How to allocate more RAM to Minecraft’! Hope we have helped you in any way possible, and now you are back at slaying the game again. You will love to play the game more now as it will be much smooth and quick so don’t waste even a minute, just follow the steps provided and get back to playing the game with more RAM.