If you’ve recently signed up for ClickUp and aren’t sure where to start, you’re not alone. ClickUp is one of the most feature-rich project management platforms available today, and learning how to use ClickUp effectively can feel overwhelming at first. This guide walks you through everything you need to know from setting up your workspace to managing tasks, collaborating with your team, and customizing your workflow in a clear, beginner-friendly way.
Whether you’re a freelancer, a small business owner, or part of a larger team, this step-by-step guide is designed to help you get productive with ClickUp as quickly as possible in 2026.
What Is ClickUp and Why Should You Use It?
ClickUp is an all-in-one productivity and project management tool that allows individuals and teams to plan, track, and collaborate on work in a single platform. It typically replaces the need for multiple tools like Trello, Asana, Notion, and Slack though it integrates with most of them if you prefer.
Some of the key reasons teams generally choose ClickUp include:
- A highly customizable hierarchy for organizing work
- Multiple views (List, Board, Calendar, Gantt, Timeline, and more)
- Built-in docs, whiteboards, and chat
- Robust free plan compared to competitors
- Automations and AI features built into the platform
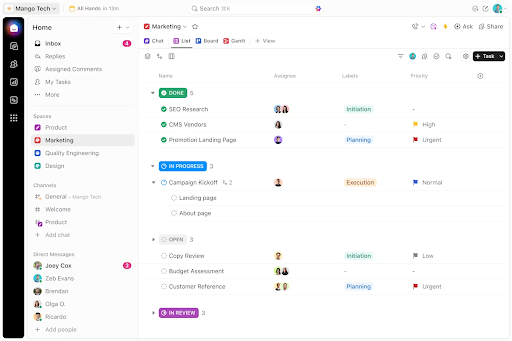
How ClickUp Is Structured: Understanding the Hierarchy
Before you dive into tasks, it helps to understand how ClickUp is organized. The platform uses a layered hierarchy that generally works as follows:
Workspace → Spaces → Folders → Lists → Tasks → Subtasks
- Workspace: Your company or personal account — the top level
- Spaces: Think of these as departments or major projects (e.g., Marketing, Development, Client Work)
- Folders: Used to group related Lists within a Space
- Lists: Where your tasks actually live similar to a project or workflow
- Tasks: Individual action items
- Subtasks: Smaller steps within a task
Understanding this structure is one of the most important parts of learning how to use ClickUp. A well-organized hierarchy typically makes everything downstream much easier to manage.
Step 1: Set Up Your ClickUp Workspace
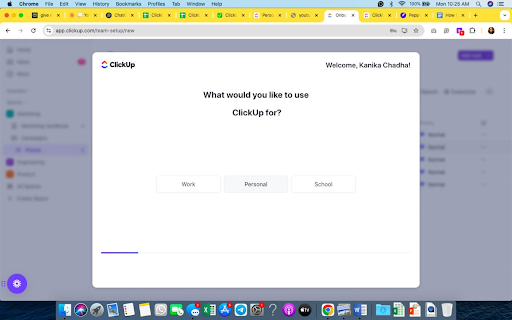
When you first sign in to ClickUp, you’ll be prompted to set up your Workspace. Here’s how to approach it:
Name Your Workspace
Give your workspace a name that reflects your business or team. If you’re a freelancer, this might just be your own name or business name. For companies, using the organization name generally makes sense.
Invite Team Members
You can invite team members from the Workspace Settings> People section. ClickUp allows you to assign roles including Owner, Admin, Member, and Guest. Guests are typically useful for clients or contractors who only need limited access.
Set Your Workspace Avatar and Color
These are small details, but customizing your workspace helps with brand alignment and makes the platform feel more like your own.
Step 2: Create Your First Space
A Space is the broadest organizational unit below your Workspace. To create one:
- Click the “+ New Space” button in the left sidebar
- Give it a name (e.g., “Marketing,” “Operations,” or “Personal Tasks”)
- Choose who has access — you can keep it private or open it to your whole team
- Select which features to enable for the Space, such as Priorities, Time Tracking, Tags, or Custom Fields
You don’t need to enable every feature right away. It’s generally better to start simple and add complexity as you need it.
Step 3: Create Folders and Lists
How to Use ClickUp Folders
Folders help you organize your Lists within a Space. For example, under a “Marketing” Space, you might have folders for “Campaigns,” “Content Calendar,” and “Analytics.”
To create a folder:
- Hover over your Space name in the sidebar
- Click the “+” icon and select “Folder”
- Name the folder and click Create
How to Create Lists
Lists are where your tasks live. You can create a List inside a Folder or directly inside a Space.
To create a List:
- Click “+” next to a Folder or Space
- Select “List” and give it a name
- Optionally, set a status workflow, color, and description
A List might represent a specific project, a workflow stage, or a category of ongoing work.
Step 4: Create and Manage Tasks
Creating a Task
To create a task in ClickUp:
- Open a List
- Click “+ Add Task” at the bottom of the list
- Give the task a name
- Press Enter or click into the task to add more detail
What You Can Add to a Task
ClickUp tasks are highly flexible. Inside a task, you can typically add:
- Description: Rich text editor for detailed instructions
- Assignees: Assign the task to one or multiple team members
- Due dates: Set a single date or a start/end date range
- Priority: Urgent, High, Normal, or Low
- Status: Customize statuses per List (e.g., To Do, In Progress, Review, Done)
- Subtasks: Break the task into smaller steps
- Attachments: Upload files directly
- Comments: Have conversations within the task
- Time estimates and tracked time
- Custom Fields: Add data points specific to your workflow
How to Use ClickUp Subtasks
Subtasks work similarly to regular tasks but live inside a parent task. To add one:
- Open a task
- Scroll to the Subtasks section
- Click “+ Add Subtask” and give it a name
Subtasks can have their own assignees, due dates, and statuses, making them useful for breaking down complex work.
Step 5: Choose Your View
One of ClickUp’s standout features is the ability to view your work in multiple formats. Learning how to use ClickUp views effectively can dramatically improve how your team works.
List View
The default view shows tasks in a vertical list format. Best for detailed task management and scanning through many items.
Board View (Kanban)
Displays tasks as cards organized by status columns. This view is typically preferred by teams that work in sprints or follow Agile methodologies.
Calendar View
Shows tasks by due date in a calendar format. Useful for content planning, scheduling, and deadline tracking.
Gantt Chart View
Displays tasks on a timeline with dependencies. Generally used for project planning where timing and sequencing matter.
Timeline View
Similar to Gantt but simpler great for visualizing workload across a team over a period of time.
Table View
A spreadsheet-style view that makes it easier to manage Custom Fields and large volumes of data.
Workload View
Shows how many tasks each team member has assigned, which helps managers identify overallocation or underutilization.
You can switch between views using the view bar at the top of any List or Folder. You can also save custom views and pin them for easy access.
Step 6: Use ClickUp Docs
ClickUp Docs is a built-in document editor that lets you create internal wikis, SOPs, meeting notes, or any long-form content directly inside your workspace.
How to Create a Doc
- Click “Docs” in the left sidebar (or “+ New” and choose “Doc”)
- Give your doc a title
- Start writing using the rich text editor it supports headings, bullet points, tables, images, code blocks, and more
Linking Docs to Tasks
You can link a Doc to a specific task or List for easy reference. This makes it simple to keep your documentation close to the work it relates to.
Step 7: Set Up Automations
ClickUp Automations allow you to reduce repetitive manual actions. For example, you might automatically:
- Change a task’s status when a due date passes
- Assign a task to a specific person when it moves to a certain status
- Send a notification when a comment is added
- Create recurring tasks on a schedule
How to Create an Automation
- Go to the Space, Folder, or List where you want the automation
- Click the “Automations” button (lightning bolt icon)
- Click “+ New Automation”
- Choose a Trigger (what causes the automation to run)
- Choose an Action (what happens as a result)
- Save and enable the automation
Even a few well-placed automations can save significant time each week, particularly for teams managing high volumes of repetitive tasks.
Step 8: Learn How to Use ClickUp Dashboards
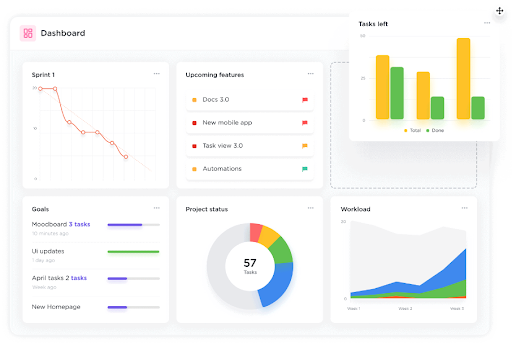
Dashboards give you a bird’s-eye view of your work with widgets showing key metrics. You can add widgets for:
- Task counts by status, assignee, or priority
- Time tracked
- Goals progress
- Workload summaries
- Custom charts
Creating a Dashboard
- Click “Dashboards” in the left sidebar
- Click “+ New Dashboard”
- Add widgets using the widget library on the right
- Arrange and resize widgets as needed
Dashboards are typically most useful for team leads and managers who need a quick summary of progress without digging into individual tasks.
Step 9: Set Up Goals and Targets
ClickUp Goals allow you to define high-level objectives and connect them to specific tasks or metrics. This is useful for teams that use OKR (Objectives and Key Results) frameworks or simply want to track progress toward broader business outcomes.
To create a Goal:
- Click “Goals” in the sidebar
- Click “+ New Goal”
- Add a title, due date, and owner
- Add Targets these can be task completions, number-based metrics, currency values, or true/false targets
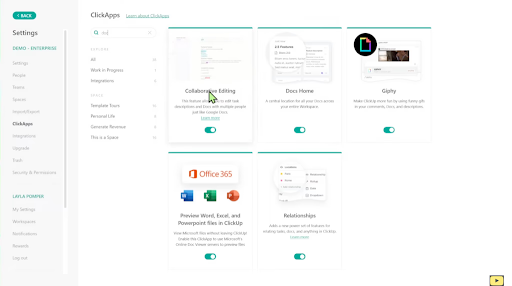
Step 10: Integrate ClickUp With Other Tools
ClickUp connects with a wide range of third-party apps including Slack, Google Drive, Zoom, GitHub, Figma, HubSpot, Zapier, and many more.
How to Set Up an Integration
- Go to Workspace Settings
- Click “Integrations”
- Browse or search for the app you want to connect
- Follow the on-screen prompts to authorize the connection
Integrations allow you to bring data in from other platforms, trigger ClickUp actions from outside tools, and generally keep your workflow connected without constantly switching tabs. This flexibility is one reason ClickUp is often considered among the top team collaboration tools for modern workflows.
Step 11: Use ClickUp AI (ClickUp Brain)

ClickUp Brain is ClickUp’s native AI feature that generally helps with:
- Writing and editing task descriptions, docs, and comments
- Summarizing long comment threads or documents
- Answering questions about your workspace data
- Generating action items from meeting notes
- Automating status updates
ClickUp Brain is typically available on paid plans. You can access it from within tasks, docs, and other areas of the platform using the AI button or the “/” command in text fields.
Tips for Getting the Most Out of ClickUp
When learning how to use ClickUp effectively, small optimizations can make a big difference in productivity and workflow efficiency. These practical tips will help you get more value from the platform without overcomplicating your setup.
Start Simple
It’s tempting to set up every feature right away, but a simpler structure is usually easier to maintain. Start with a few Spaces and Lists, and expand as your needs grow.
Use Templates
ClickUp has a large template library covering project management, HR, marketing, software development, and more. Templates can save significant setup time and give you a proven structure to build on.
Use the ClickUp Mobile App
ClickUp has mobile apps for iOS and Android. The mobile app generally covers most core features and is useful for checking tasks, adding comments, and updating statuses on the go.
Keyboard Shortcuts
ClickUp has a range of keyboard shortcuts that can speed up navigation. Press “?” from anywhere in the desktop app to see the full shortcuts list.
ClickUp University
ClickUp offers a free learning resource called ClickUp University, which includes video lessons, certifications, and guided paths. If you prefer structured learning, this is typically a worthwhile place to spend some time.
Common Mistakes to Avoid When Using ClickUp
If you’re learning how to use ClickUp, avoiding a few common mistakes early on can save time and keep your workspace organized. Here are key pitfalls that can limit productivity if not handled properly.
- Over-complicating the hierarchy early on: Too many Spaces, Folders, and Lists can make navigation harder than it needs to be.
- Enabling every feature at once: Turning on every available feature before understanding them often creates noise rather than clarity.
- Not standardizing statuses: Different status names across different Lists can make reporting and filtering inconsistent.
- Skipping training for team members: If even a few people on your team aren’t using ClickUp consistently, collaboration tends to break down.
Conclusion
Learning how to use ClickUp doesn’t have to be overwhelming. The key is to start with the basics, set up your hierarchy, create tasks, choose the right views, and add complexity only when you need it. ClickUp is a powerful platform, and the more intentionally you approach it, the more value you’ll typically get out of it.
Whether you’re using it solo or rolling it out across a team, following the steps in this guide should give you a solid foundation to build on in 2026. As your workflows evolve, explore automations, dashboards, integrations, and ClickUp Brain to continue streamlining how you and your team work.