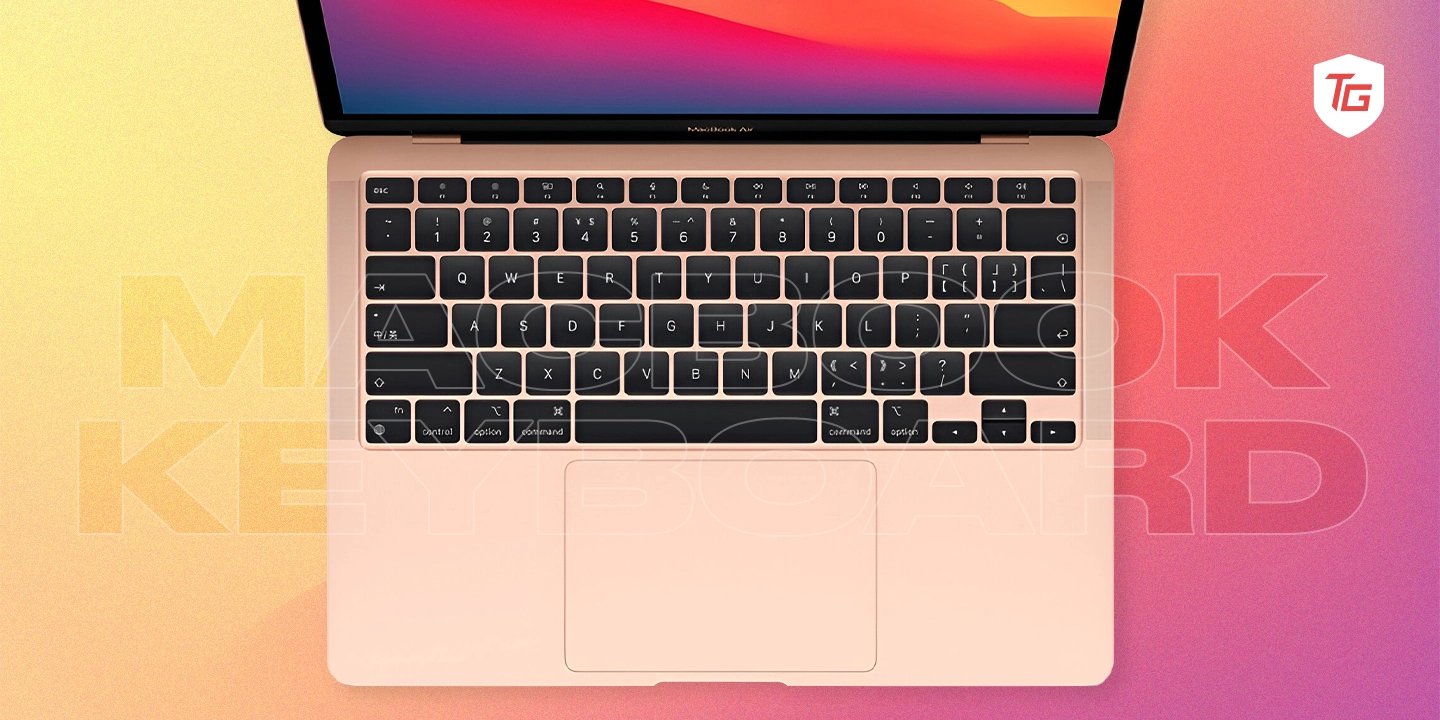
Have you ever experienced a frustrating moment when your Mac’s keyboard seemingly goes on vacation, leaving you puzzled and unable to type? It’s as if the keys decide to take a coffee break and haven’t returned from their leisurely outing at the cafe yet! In this guide, we’ll explore the frustrating issue of a non-functioning Mac keyboard and provide you with solutions to bring its typing powers back.
Whether you’re an experienced writer, a skilled coder, or simply someone looking to type emails without any frustrations, we’re here to help solve your keyboard troubles. Let’s dive into the journey of restoring your Mac’s keyboard to its original smooth and satisfying typing experience!
Why MacBook Keyboard to Stop Working?
Here are some common reasons why your MacBook keyboard might stop working.
- Dust and Debris: One common cause of keyboard issues is the build-up of dust, crumbs, or other debris underneath the keys. This can gradually hinder keypresses and even result in unresponsive keys.
- Software Errors: Occasionally, keyboard issues can arise from a simple software glitch. This could occur following a macOS update or due to conflicting applications.
- Keyboard Settings: Sometimes, unexpected behavior with your keyboard can occur if the settings have been accidentally changed.
- Hardware Issues: If your MacBook’s keyboard stops working, one possible cause could be a hardware issue. This might occur if a component of the keyboard becomes damaged or malfunctions.
1. Restart Your Mac
One of the simplest solutions to fixing a non-responsive MacBook keyboard is to restart your Mac. The act of restarting your computer can often rectify minor glitches and bugs within the system that may be the root cause of your keyboard issues. So, let’s break it down into simple steps you can follow:
1. Click on the Apple icon and Select the Restart option from the dropdown menu.

2. Wait for your Mac to shut down completely then turn it back on after a few moments.
3. Once logged in, check if your keyboard is functioning properly.
If the problem persists after restarting your Mac, don’t fret just yet. There are plenty more solutions that can help resolve your keyboard issues, which we’ll continue to explore in this guide.
2. Clean the Keyboard
One common issue many MacBook users face is a non-responsive keyboard. Often, this problem is caused by dust or debris getting under the keys. Here is where cleaning your keyboard comes in handy. It’s a relatively simple process that can really make a difference.
- Turn off your MacBook: Ensure your device is shut down properly. This prevents any accidental key presses and potential damage.
- Compressed Air: Use a compressed air canister to blow out debris. Tilt your MacBook at an angle and spray the compressed air into the keyboard in a zig-zag pattern. Please remember to keep the straw on the canister about half an inch from the keyboard to avoid any damage.
- Clean the Keys: Use a microfiber cloth to gently clean the keys. If stuck keys persist, they may need to be removed and cleaned individually.
Remember: Regularly cleaning your MacBook keyboard can prevent many common issues and keep your device running smoothly.
3. Plug into the Charger
Another tactic you might find useful is to plug your MacBook into the charger. It might sound strange, but some users have experienced keyboard issues due to low battery conditions. Low power status might cause glitchy behavior in some of MacBook’s functionalities including the keyboard. So, giving it a good charge could potentially solve your problem. But remember, don’t overcharge it either.
How to charge your MacBook properly:
1. Plug the USB-C charger into a power outlet.
2. Connect the other end of the charger to the charging port of your MacBook.
3. The battery status bar should indicate that your MacBook is charging.
4. Let it charge until it’s at least 50-60% full.
This could be the easiest fix if low power is the issue. However, if the keyboard still doesn’t work as intended after charging, power-related problems might not be the cause.
4. Update macOS on Mac
Keeping your macOS up to date is not just about having the latest features; it’s also critical for maintaining optimal performance – and this includes the smooth operation of your keyboard. Sometimes, a problematic keyboard could simply be the result of outdated software.
So, let’s go ahead and check if an update is available.
1. Click on the Apple icon at the top left then select ‘System Settings‘ from menu.

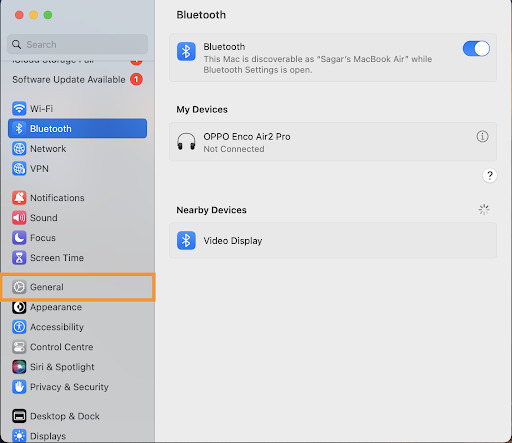
2. Once in System Settings, locate and click on General settings.
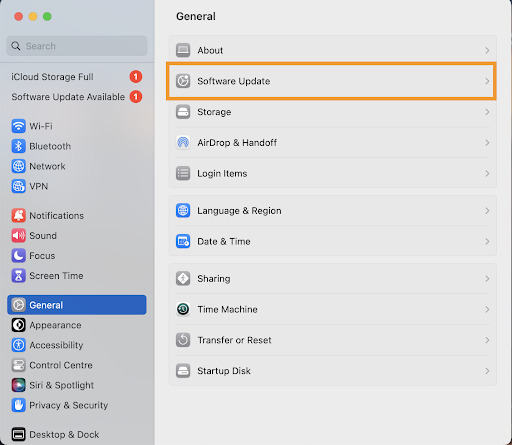
3. Now, go to Software Update.
4. Your Mac will automatically start checking for any available updates. If there is one, you’ll see an ‘Upgrade Now‘ button. Click the button to start installing the latest macOS.
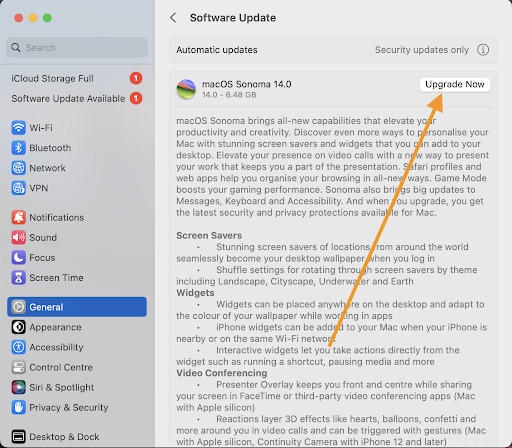
After following these steps, check if your keyboard is working.
Note: It’s always wise to back up your data before installing any major system updates. This ensures that even in the unlikely event that something goes awry during the update process, you won’t lose any important files.
5. Uninstall Recent Apps
If your MacBook keyboard isn’t working as expected, a recently installed app could be interfering with your keyboard’s performance. More precisely, certain apps may change your system configuration or keyboard settings, causing problems with keyboard functionality.
How to uninstall apps on mac:
1. Start by clicking on the Finder icon in your MacBook’s dock.
2. In the left side panel, choose Applications.

3. Scroll through the list of installed apps and find the one you’ve recently installed.
4. Right-click on the app and choose Move to Bin.
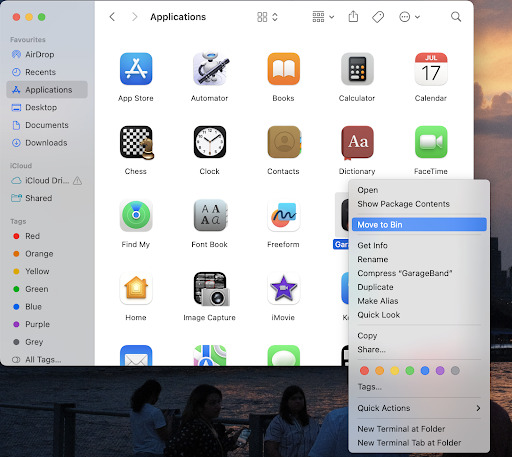
Remember to empty your Trash to fully complete the uninstallation process.
Note: Always be cautious when installing new apps on your MacBook, as some software can inadvertently cause technical issues. It’s best to only use trusted sources to download software.
6. Turn Off Slow Keys and Sticky Keys
If your MacBook’s keyboard is not responding as it should, the problem might be related to the Slow Keys or Sticky Keys feature. These are accessibility features designed for individuals having difficulty using the keyboard. When activated unintentionally, these can cause problems with the normal functioning of your keyboard.
Slow Keys modifies the time delay between when a key is pressed and when it is registered, which can cause slow typing or missed keystrokes. On the other hand, Sticky Keys allows users to press one key at a time for commands that normally require more than one key pressed simultaneously. Turning these features off can potentially resolve your keyboard issues.
Follow the step-by-step guide below:
1. Click on the Apple menu and open System Settings.
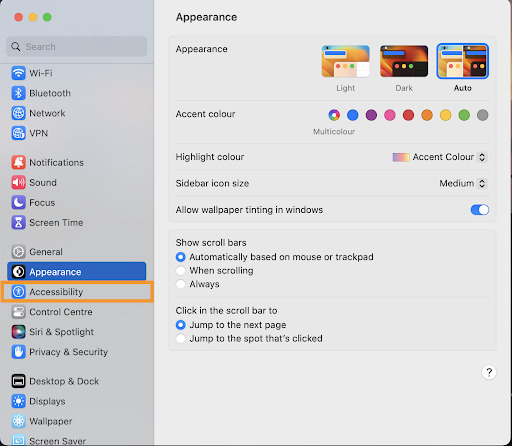
2. Choose Accessibility.
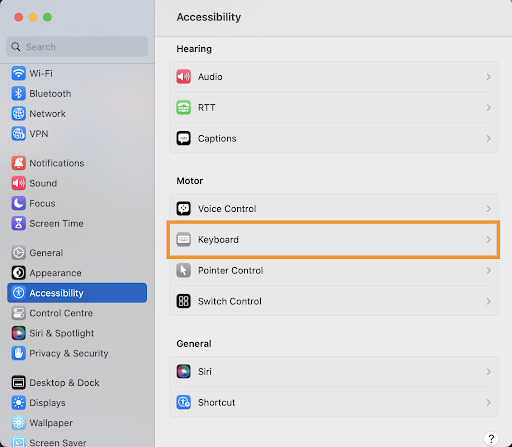
3. Scroll down and click on Keyboard.
4. Choose “Hardware“(available in the previous macOS).
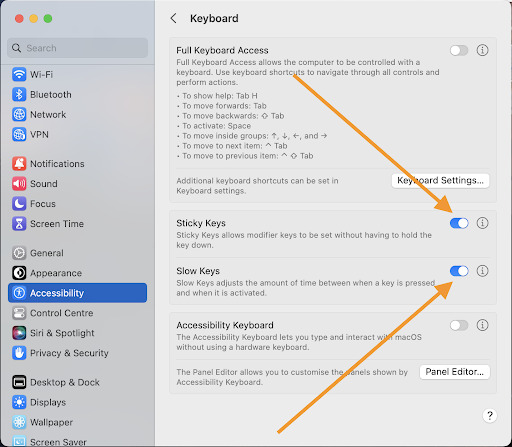
5. Here, you will see the settings for Slow Keys and Sticky Keys.
6. Ensure both are turned off.
7. Disable Mouse Keys
If your MacBook keyboard is still not working, one possible solution could be to turn off Mouse Keys. Mouse Keys is a feature that allows you to control your mouse pointer using the numeric keypad. This can sometimes interfere with the keyboard functionality, causing it to not respond properly.
Steps to turn off Mouse Keys:
1. Open System Settings from the Apple menu.
2. Click on Accessibility.
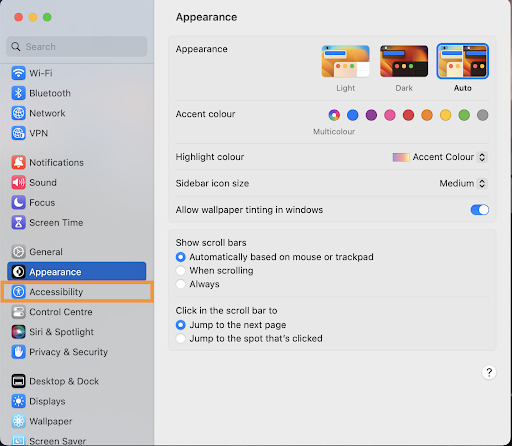
3. From the sidebar, select Mouse & Trackpad.
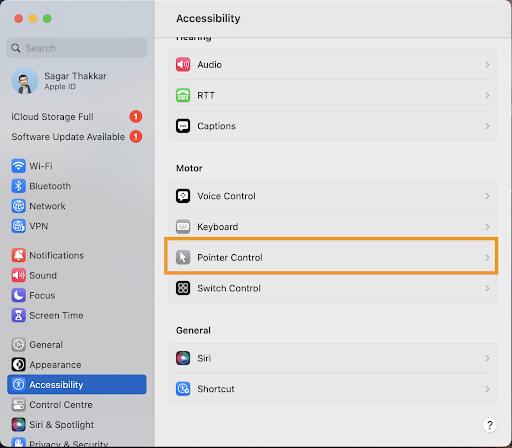
4. In the right pane, uncheck the box that says, “Enable Mouse Keys“.
By disabling the Mouse Keys feature, you might just get your MacBook’s keyboard back to functioning normally. However, remember to restart your MacBook to ensure these changes take full effect.
8. Remove Any External Keyboard
Often, the issue of your MacBook keyboard not functioning properly could be due to interference from an external keyboard. If you have an external keyboard connected to your MacBook, the system might be getting confused between the input from the external keyboard and the built-in one. Therefore, it’s important to disconnect any external keyboard to see if that solves the issue.
1. Firstly, unplug the USB cord of the external keyboard from the MacBook.
2. After removing it, try to use the built-in keyboard.
3. If the built-in keyboard starts working properly again, the problem is likely caused by the external keyboard.
If this solution doesn’t work, it probably means the problem is not due to an external keyboard.
9. Reset PRAM and SMC
At times, your MacBook keyboard may not work due to misconfigured or corrupted settings in the Parameter RAM (PRAM) or System Management Controller (SMC). A reset may therefore be required. So, how do you go about resetting the PRAM and SMC? It’s actually quite straightforward.
How to Resetting PRAM on Mac
1. Shut down your MacBook.
2. Find the Command, Option (Alt), P, and R keys on your keyboard.
3. Turn on your MacBook and immediately press and hold these four keys simultaneously.
4. Release the keys after about 20 seconds.
This process will reset your PRAM. If the keyboard issue perseveres, you may need to reset your SMC.
How to Resetting SMC on Mac
1. Shut down your MacBook.
2. Press and hold the left Shift, Control, and Option keys and the Power button at the same time.
3. Release all keys and the power button at the same time – this should reset your SMC.
Remember to always keep your data backed up to prevent any possible loss during these resets. With these steps, your MacBook keyboard should be back to normal operation.
10. Contact Apple Support
Reaching out to Apple Support is simple and can be done in several ways. You can start a chat online, schedule a call, or even arrange a visit to an Apple Store or an authorized service provider.
Remember, it’s crucial to back up any important data before you hand over your MacBook for any kind of repair or service. You might not want to risk losing any important files or documents.
Conclusion:
Dealing with MacBook keyboard issues can be incredibly frustrating. However, with a little guidance and some patience, you can often resolve these problems on your own without needing to seek professional assistance. The following trouble shooting steps are not only effective but also straightforward, making it easier for you to navigate through the process smoothly.
Before you start any hardware repairs or service, it is crucial to back up all your important data to prevent any potential loss. Be proactive and protect your valuable files.
In case you missed it!

